


📝Creating Questions: Getting Started
To see the full basic end-to-end process watch this video:
First of all, head to “Tools” at the top of your ATS dashboard and select “Questions” as seen in the image below:

You will then see a screen that looks like this:

Next you will need to click on the “Question Type” drop down in order to pick which type of question you would like to create:

Depending on which question type you choose, will alter the edit options shown, such as “choices”, “scoring” and so on.
➡️Question Content Box
After choosing your question type, type the question that you would like to ask into the “question” content box.

At the top of the question box there are some icons that you can use to format the style of your question.
You can also add in a link to direct the respondent to a website for example, a hosted image or even ask your question in a prerecorded video.
➡️Choices
Add in the different answers that you would like the respondent to choose from. You can also add more by clicking the + symbol. This section will look different depending on the question type you have chosen to create.


➡️Score, Thumbs Up & Thumbs Down
Next to your “Choices” you will see the option to add scores if you want. Add scores to each of the answers if you would like the respondent to stand out when you are reviewing the questionnaire. Scoring can also be used to automate actions such as auto rejecting candidates or automatically moving them to the shortlist stage.
In order to add scores simply enter a number in the box (this can be any scale, for example 1-100) - next to each numbered score also make sure to click the thumb to indicate which scores equate to a correct answer and which equate to an incorrect answer.
A thumbs up indicates that this is your preferred response, whereas a thumbs down indicates an incorrect answer.

➡️Guidelines for user
Provide the respondent with any important guidelines that may help them to complete your question.

➡️Required question
Toggle this on or off to use.If selected the respondent will have to answer the question before moving on to the next step.
➡️Killer question
Toggle this on or off to use. If selected and the candidate chooses an answer with a thumbs down aligned to it, they will not complete the remainder of the questionnaire, and a pop up will appear on the screen.
If the questionnaire that the question forms part of is set to automatically reject the candidate if a killer question is selected then they will move to rejected status.
➡️Answer visible to privileged managers only
If selected, only those user types with the correct permission enabled will be able to see the responses to these types of questions.
This permission is set on a per user basis within the Manage administration tool.
For more information about creating individual Question Types see below ⬇️
⁉️Individual Question Types
➡️How To Create A Radio Button Question Type.
This type of question will only allow one response from the choices available by moving the radio button to the chosen answer.

In order to create a “Radio Button” you simply need to enter your question into the text box and enter in the choices you would like the respondent to see.

In this example we have put “yes” or “no” and updated the thumbs up & down to match each option, though you can add more options if needed by pressing the + symbol.

If needed you may also want to add a score.

If you use “Heirarchy” you will see this “Organisation” option and will give you the option to add this question.

This text box allows you to enter any “Guidelines for user” if needed. Depending on your question and who the question is attended for will determine your guidelines.
After completing all of the previous steps you will need to decide whether you want your question to be a required one, a killer or only visible to privileged managers only using the toggle.

Once done, press the Add button to complete the process.
➡️How To Create Checkbox Question Types
Checkbox question types can be used to allow the respondent to choose one or more responses from the options you provide.
In order to create a “Checkbox” question, follow the same steps as a radio button question type.

Update the thumbs up & down to match each option, though you can add more options if needed by pressing the + symbol.
If needed you may also want to add a score.
If you use “Heirarchy” you will see this “Organisation” option and will give you the option to add this question.
This text box allows you to enter any “Guidelines for user” if needed. Depending on your question and who the question is attended for will determine your guidelines.
After completing all of the previous steps you will need to decide whether you want your question to be a required one, a killer or only visible to privileged managers only using the toggle.
Once done, press the Add button to complete the process.
➡️How To Create A Drop-Down List Question Type
A drop-down list question type can be used to provide a drop-down list of options of which only one may be selected.
In order to create a “Drop-Down List” question, follow the same steps as a radio button or checkbox question type.

Update the thumbs up & down to match each option, though you can add more options if needed by pressing the + symbol.
If needed you may also want to add a score.
If you use “Heirarchy” you will see this “Organisation” option and will give you the option to add this question.
This text box allows you to enter any “Guidelines for user” if needed. Depending on your question and who the question is attended for will determine your guidelines.
After completing all of the previous steps you will need to decide whether you want your question to be a required one, a killer or only visible to privileged managers only using the toggle.
Once done, press the Add button to complete the process.
➡️How To Create A Single Field Question Type
Single field question types are generally used to create a question where you require a shorter and more specific answer.
In order to create a “Single Field” question type you simply need to enter your question into the text box and then choose the type of "Validation" needed to answer this question from the drop down list.

If you would like more information on the Validation Rules within a Single Field question 🖱️click here.
After completing all of the previous steps you will need to decide whether you want your question to be a required one, a killer or only visible to privileged managers only using the toggle.
Once done, press the Add button to complete the process.
➡️How To Create A Text Area Question Type
“Textarea” question types allow you to ask a question that may require longer text (multiple sentences) to answer.
You may choose this type of question if you would like to provide the respondent with some space to answer your question in their own words. However you may also choose to restrict the number of words used.
In order to create a “Text Area” question type you simply need to enter your question into the text box and then choose the type of "Validation" needed to answer this question from the drop down list.

If you would like more information on the Validation Rules within a Text Area question 🖱️click here.
After completing all of the previous steps you will need to decide whether you want your question to be a required one or only visible to privileged managers only using the toggle.

Once done, press the Add button to complete the process.
➡️Validation Rules On Free Text Questions
When creating Single Field or Text Area - free-text questions within the ATS you can set rules against the answers that can be submitted.

By default questions do not have any validation assigned to them, this is shown in the validation field as N/A.
When selecting the drop-down menu under 'Validation', you will see a series of options that looks like this:

🔸Date
This validation option will only allow answers to be submitted in the form of a date.

🔸Time
This rule is used when an answer needs to be provided as a time.

🔸Email Address
When you are asking for someone to provide an email address this validation option will make sure the answer provided is in the correct format of an email address.


🔸Min/Max Character Alpha
This restricts answers to a specific number of characters. You can specify your requirements in the 'Min' and 'Max' fields.

🔸Min/Max Alpha-Numeric
This restricts answers to a specific number of numbers and letters. This includes special characters. Again, you can specify your requirements in the Min and Max fields.

🔸Begins With
If you need to make sure all answers begin with a specific word or phase this can be set.

🔸Ends With
This rule will make sure every answer ends with a specific phase/word/letter of your choice.

🔸Custom (Regex)
At Tribepad we support the use of PHP Regex formulas, this option will allow you to specify your own rule using a Regex formula.


🔸Min/Max Alpha-Numeric No Special Characters
This restricts answers to a specific number of numbers and letters only. This excludes ALL special characters. Again, you can specify your requirements in the Min and Max fields.
.

🔸Min/Max Word Count
If you want to limit candidate answers to a word count you can specify your requirements here.

➡️How To Create A Situational Judgement Test (SJT) Question Type
SJT question types can be used to provide a candidate with a fictional scenario in which they may encounter in their day to day role.
You can provide multiple answers for the candidate to rate in order of their preferred response which helps you determine whether the candidate is suitable for the role.
In order to set up a SJT question, you must first create a scenario and type this into the “Question” box, as with other questions you can also add Guidelines if needed.

You then need to decide on your SJT grid size. With the rectangle on the left being a space for your answer, and any boxes to the right being for any scoring you would like to set up. For example, Most to Least Likely to answer in a certain way.
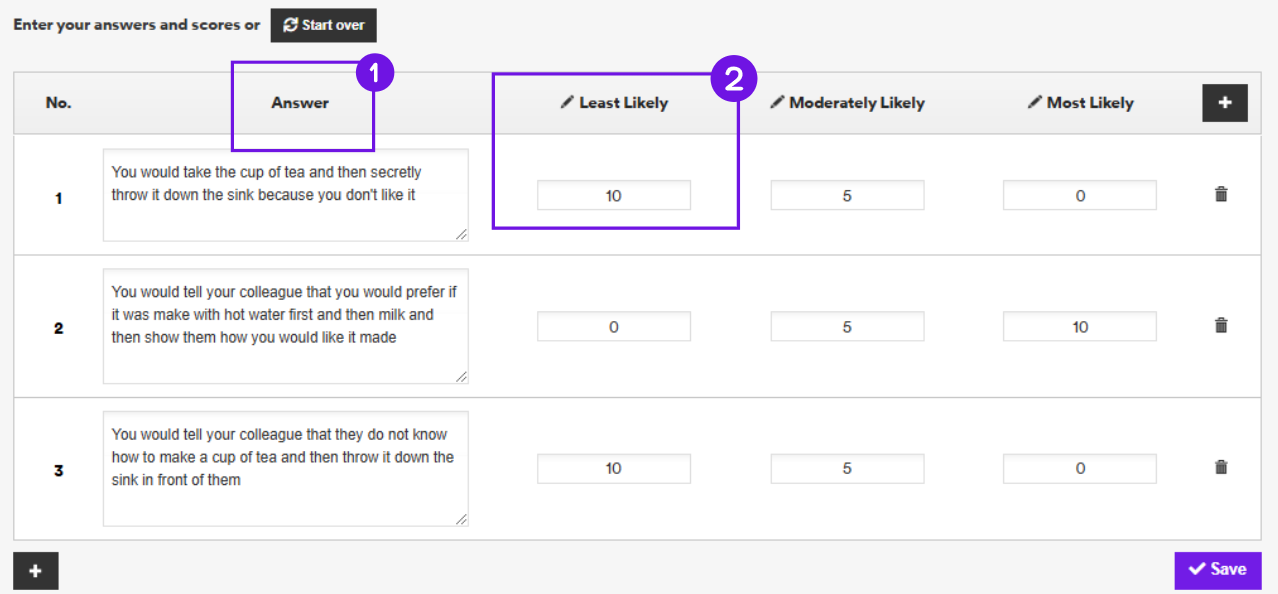
Once you have selected your grid size the screen will reload to look like this, where you can enter your potential answers and scoring.
If needed you can add more lines by clicking on the + symbol. You can also start over entirely if needed by clicking the start over button.
Once you are happy with your grid and answers press save.
After completing all of the previous steps you will need to decide whether you want your question to be a required one or only visible to privileged managers only using the toggle.
Once done, press the Add button to complete the process.
➡️How To Create A Content Box Question Type
Content Box question types are generally used to provide larger amounts of information.
A great example of this might be to provide a disclaimer at the start of a questionnaire or to let the respondent know why you are asking the questions, what you will be doing with them and who will have access to the responses.

To create this question type is as simple as adding the relevant information into the content box as shown.
Once done, press the Add button to complete the process.
➡️How To Create A File Upload Question Type
A file upload question is a great tool for candidates to upload either an image, document or even media file depending on the needs for the role. This upload is part of the questionnaire that the candidate will answer.
To start, enter your question within the content box.
If your file upload is something specific like Media and you want the candidate to upload a file/video you may want to enter some "Guidelines". This could be to explain to the candidate to only upload a .mp3 file for example.

Once done, press the Add button to complete the process.
➡️How To Create A Grid Question Type
Grid questions are a great way to pose a question to a candidate and find out what level of priority the candidate places on the question.
This could be used for H&S questions, or questions relating to shift patterns and/or uniform requirements.
To start, enter your question within the content box.

Once you have added your question you will see a Grid below. If you hover over this you can then select how big you want your grid to be.

Once clicked this allows you to enter your question answers. On the left, these are the answers we want our candidates to answer.

At the top, you can enter what you want your candidate to consider is the most important. Do this by selecting the pencil icon and entering any relevant information.
For example, as you can see 1st, 2nd etc… has been added to the top bar.

Lastly, the numbers in the middle are the score you will give to your candidates' answers.


Once you are happy please click save.
❔How To Edit Questions
Once a question has been created on the ATS you are able to amend this at any time.

In order to do this head over to the tools tab in the menu bar and select “Questions”. Once you have clicked into the questions tab you will be presented with the questions page.

Once on this page, scroll down in order to see the full “Question Bank” (a list of all previous questions that have been created).

In order to find the question you are wanting to edit, use the “Search Questions” function and type in the question title.

When you have found the question you want to amend, you will also be able to see the question type and also the date it was created.

To make a change to the question you will need to hover your mouse over the question, this will then give you 2 options to the right near the date.

The pencil icon is what you will need to use to edit the question and the X icon is to delete the question.

After clicking the edit button you will be presented with the question details, from here you are able to amend the question type, any spelling mistakes or simply change the question all together. There is also functionality to add new guidelines for users or amend existing guidelines, and to make the question required or a killer question if not already. You can also make the candidate's answer only visible to privileged managers.
You can add or change the scoring system for that particular question here as well.

Once you have made the required changes and are happy with your new question, you will need to click on the finish button in the bottom left corner, this will ensure that your newly edited question is added to your questions bank.