Find out about Tribepad's answer to Docusign
For some time, Tribepad has provided access to the integration Docusign. Lots of our customers use this, to give the candidate the feeling of physically ‘signing’ a contract.
We have now created our own version, to negate the need to use an external 3rd party.
Tribepad’s ‘E-sign’ allows candidates to create an electronic signature to use on a contract, and also to add stylised initials to documents as well.
Creating a Contract with E-sign elements
To use E-sign, certain variables need to be added into a contract. These can be added to a new or existing contract.
Go to the ‘Tools’ menu (or ‘Jobs’ menu, depending on your configuration) and select ‘Offers and Contracts’ (or ‘Document templates’, depending on config.):
Select the relevant contract:
Locate where in the document you would like to add new variables:
Select the ‘Add variables’ button in the top left-hand corner of the screen:
You will be presented with the usual list of variables that can be added into a contract:
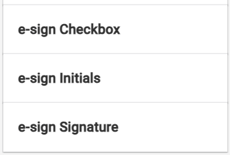
The new variables that relate to E-sign are:
- e-sign checkbox
- e-sign Initials
- e-sign Signature

- These will typically be displayed at the bottom of your list of variables.
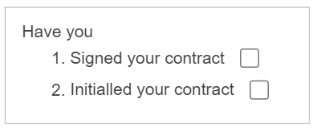
- The ‘E-sign checkbox’ allows a tickbox to be added to the contract - this might take the form of a checklist, for example
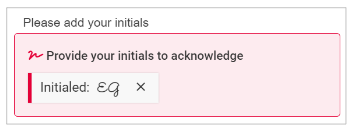
- The ‘Initials’ will allow for stylised initials to be placed in the contract next to relevant fields
- The ‘Signature’ allows the candidate to type their name and select a style of font they would like to be attached as their ‘electronic signature’.
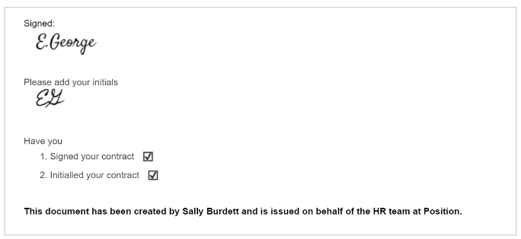
You can see what these look like further down in this article.
To add each variable in, simply click in the document where you would like it to appear, and either click or drag the variable over to insert it into the contract:
If you Preview your document, you will be able to see what the candidate will see:
Generating a contract with E-sign
When generating a contract for a candidate, E-sign only works with the ‘Offer job - Contract Generation’ option in the ATS:
- You should go through the usual contract generation process - this functionality has not changed.
For more information on generating contracts, click here.
Enter the variables:
Preview and Generate:
Send offer:
Candidate view of Contract and E-sign
Once a candidate has been moved to ‘Offered’ stage in the ATS, they will see the usual call-to-action on their Dashboard:- The candidate should click ‘Got it!’ to review their contract.
They can click on the red icon in the bottom right corner at any point, to add their initials or signature (as specified when the contract was created):
Clicking on the red icon opens up the options to the candidate:
- They can hide the expanded red banner by clicking on the three vertical dots on the left-hand side
- They can also return to the top of the page by clicking on the arrow icon on the right-hand side.
Clicking on either the ‘Initials’ option or ‘Signature’ option takes the candidate to the section in the contract where the new variables were added:
In order to create an e-signature, the candidate should enter the text they wish to use as their signature:
- They should then click ‘Create signature’ to select which signature style they wish to use
They can then select the relevant style and this will be inserted into the contract:
- If the candidate wishes to change the style of their e-signature, they can simply click ‘Edit’ and select another option
- Likewise, if they need to edit the text of the signature, simply click ‘Edit signature text’.
To add initials to a contract, the candidate should simply enter their initials and click ‘Confirm’:
The screen will refresh and the candidate’s initials will be shown on the screen:

Please note - Unlike with the Signature, there is no option to select a ‘style’ for the initials.

The relevant options in the list should be selected and then the once all e-sign elements have been completed, the candidate can confirm they have read and understood their contract, with the toggle option at the bottom of the screen:
When the ‘Approve and submit your contract’ option is selected, the screen will refresh and the candidate will be presented with the following option:
Once the candidate has accepted the offer, their screen will refresh and they will see that the acceptance has been registered:

Candidate view of Requesting Changes / Rejecting the contract
When a contract is sent to a candidate, they have the option to ‘Request Changes’ or ‘Reject’ the contract.With E-sign, this has not changed, but the position of those options has changed.
They are now positioned at the top of the screen on the left-hand side:
When requesting changes or rejecting the offer, the candidate does not need to do anything with the E-sign steps
- Functionality of these two options has not changed, and notifications will go to the Recruiter as they are utilised.
ATS User view of Accepted contract
Once the contract has been accepted by the candidate, they will automatically move into the ‘Accepted’ bucket in the application journey.This is as usual, and functionality has not changed here:
- Hovering over the ‘Contract’ icon on a candidate’s profile will show that they have accepted the contract, and also the contract icon will turn green.
To view the electronically signed contract, simply click the Contract icon.
You will see the same screen that candidate sees initially:
To see the e-signature, simply scroll down the contract to where the e-sign variables were added in the contract:
- You will also see a stamp on the contract of the candidate’s IP address and date and time stamps
Important things to know
- As already mentioned, the E-sign functionality currently only works when a contract is generated via the ‘Offer job - contract generation’ option under the Options menu
- This is a paid feature and will require a contract amendment. This amendment includes wording that only indemnifies the signature as legally binding in the UK. This is not to say the signature/contract is not legal outside of the UK, just that we have not had this checked legally in every country.