Find out how to use an Output Rule to make your data perform in a specific way.
Within Insights, you have the capability to create your own reports. You also have the capability of making the data present itself in a certain way, by adding an Output Rule.
An output rule can be added to a column within a Custom Report, and allows the data within that column to be validated, formatted or transformed when it is exported from the platform.
Please note – output rules can only be added to Custom Reports, not the pre-built reports that are available to you in Insights.
For more information on creating a Custom Report, click here.
To add an output rule to a column, you will need to access Insights in the usual way.
Adding an Output Rule
Once you have logged into Insights, select the ‘Report Manager’ option on the left-hand side:

Output rules can be added when you first create a new Custom Report, or they can be added into an existing custom report.
- For this example, we shall use the existing report ‘Training example’:

Select the relevant report, and then scroll down to ‘Extended Report Configuration’ and launch your Column Configurator:


Within each column section in the Column Configurator, you can add an output rule:

If you know what your output rule needs to be, you can just go ahead and add it in to this field.
If you do not know what your output rule needs to be, you can use our handy 'Column Configuration Help' section at the top of the page:

Clicking on this section will open another tab on your browser. It will look something like this:

If you scroll down the page, you will see several sections relating to output rules:

Clicking into each section will give you many examples of output rules that you can use within your own reports, depending on what you would like your data to do when it is exported:

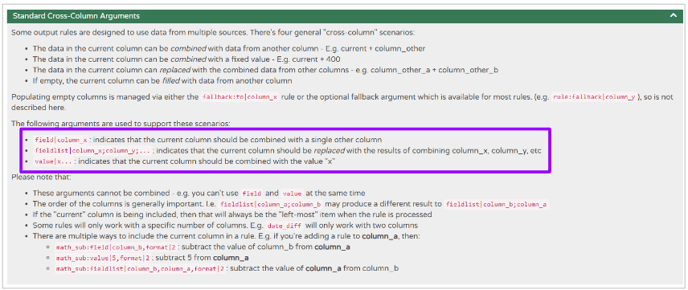
- For example, you might want two columns to combine together for a cumulative total of days spent in a particular status on the ATS
- In this case, you might want to use a rule in the 'Standard Cross-Column Arguments' section:

- Or you might want everything in a certain column to be CAPITALISED
- In this case, you could use a rule from the 'Output Rule Overview' or 'Text Processing Rules' sections:


-
- Scroll further down the section and you will see further rules that can be used:

-
- In this case, the 'upper' rule could be used (highlighted above).
- Or you may want your Sort Code column to retain the format which the candidate originally put into the platform, e.g. keep a sort code with a ‘0’ at the beginning, rather than it being removed when the data is exported.
- In this case, you could use a rule from the 'Standard Optional Arguments' section:

-
- Scroll down the section to the 'CSV Escaping' header, and use the 'csvescape' rule:

-
- You can also add 'punctuation' to this rule to keep the hyphens in the sort code, if they have been originally input by the candidate:
- The whole output rule would then read 'text:csvescape,punctuation'.
Please note - with any data that has been input into the platform which you wish to be formatted / exported in a specific way, you will most likely need to add the prefix 'text' to your rule.
Please also note - if you are working within the Column Configuration Help section to find a specific output rule, you may find that you are timed out of Insights.
Insights has a 15-minute timeout function, so if you are in the middle of configuring a report template, please ensure you keep saving it to avoid being timed out.
Once you have located the specific output rule that you would like to use, you can test it out using our ‘Output Rule Tester’ at the top of the screen:

A new tab will be opened in your browser and will look something like this:

In the tester tool, you can enter your output rule and some test data to check the effect of adding an output rule to a column.
You can see some popular examples in the example table in the middle of the page:

If these are helpful to you, feel free to use these.
In order to test an output rule, you should enter your test data and your output rule into 'example_column_1'
- For this example we could use the csvescape output rule we created above:'text:csvescape,punctuation'
- Click 'Submit' under the example table when you have entered your output rule, and this will verify it's validity:

- As you can see from the example above, the output rule has been verified and has worked correctly
- The example output in a report, if the output rule is valid, will show at the bottom of the page (as highlighted above).
If the output rule has not been input correctly, the tester tool will show an error message like this:

- In this example, we missed off the initial 'text' section from the output rule used above.
Once you are happy with your output rule, you can add it into your column.
- The easiest way to do this, is simply copy the rule from the tester tool and input into the relevant column in your report:

Make sure you select ‘Accept’ on the Column Configurator and save your template at the bottom of the page:


Please note – if there are any error messages with the output rule(s) you have included in your report, you will be shown an error message when you try to ‘Accept’.

Once the report has been saved, you will see the ‘Template Output’ option at the top of the page:

Clicking on this option will show what the report will look like once exported from the platform:

Please note – you will not see Onboarding information (highlighted above) shown on this screen.
Sensitive data such as this can only be viewed when exported from the platform using an Export Configuration which has been attached the the report.
For more information on Export Configs and exporting sensitive data, click here.
Within this Template Output, you can save and/or schedule your report or export it immediately from the platform. This is done in the usual way.
For more information on saving, scheduling and exporting data from the platform, please click here.