Find out how to use our Recruit in Hours functionality
Typically, as a recruiter, you may traditionally recruit in Positions, rather than Hours.
However, we understand that there is a requirement for certain industries to be able to recruit in Hours instead.
- With this new functionality, you will be able to specify the number of hours that are allocated against a job and deduct as appropriate as they are offered to candidates.
Please note - this function needs to be enabled for you by Tribepad. If this is something you are interested in, please speak to your Tribepad Account Manager or contact the Support Helpdesk.
Specifying hours on a Job
Once enabled, this function can be applied to job templates, existing jobs or new jobs created in the ATS.
To add a number of hours to a job, you should navigate to the Jobs List page:
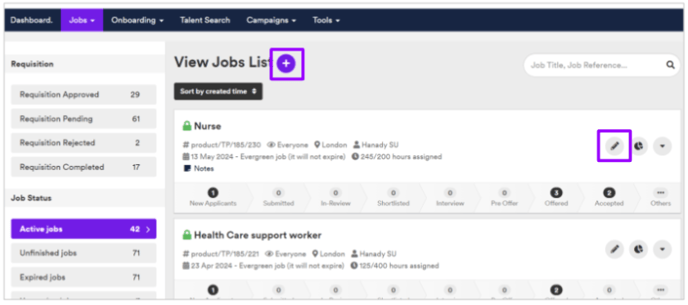
- You can create a new job by selecting the ‘+’ symbol, or edit the job using the pencil icon on the right-hand side.
Select your relevant template and add in the relevant Job Title.
You will then need to select an option under the ‘Job Quantity’ field:

- Select whether you wish to recruit for a number of positions or in hours
- State how many positions or hours you require, in the free-text field on the right of the screen.
If you are selecting ‘hours’, you might enter ‘200’ in the free-text field, for example:

Once you have entered this information, you can complete the job as usual.
Once it is active, you will see the job in the Jobs List.
- A job that is linked to positions will show like this:

- A job that is linked to hours will show like this:

If you hover over the area where hours are shown, you will see this:

- As candidates are hired against the job and a number of hours are assigned to them, this figure will change accordingly.
If you click into the Job, you will also see the number of hours detailed there as well:

Assigning hours to a Candidate
Once you have selected the right candidate for the role, you can assign a specific number of hours to them.
To do this, navigate to the job in question and find the relevant candidate:

To allocate hours to a candidate, you will need to go through the ‘Extended Offer Process’ and issue a contract.
Please note - the necessity to send a contract can be turned off at this point if you wish.
The permission to turn this off is ATS - Allow offer generation without contract.
Select your candidate and open the ‘Options’ menu:
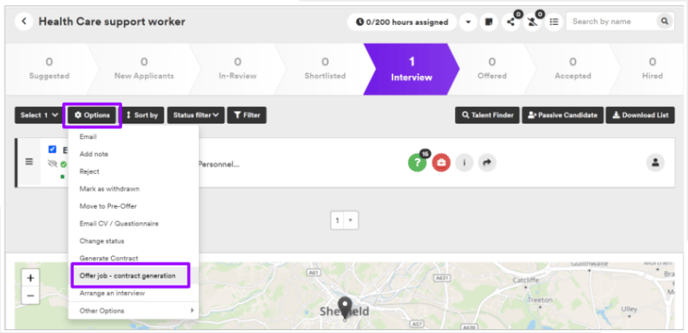
- Select ‘Offer job - contract generation’ - this might be titled something slightly different, depending on if we have made translation changes in the platform.
The screen will refresh and you can enter the amount of hours that you want to assign to that specific candidate:
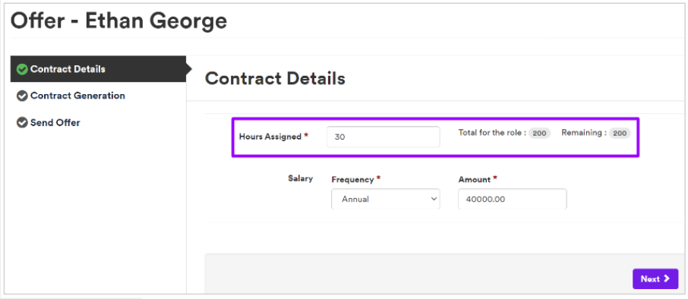
You can then go through the rest of the Offer Extended Process as usual.
You will also see the number of hours specified before the final contract is generated to the candidate:
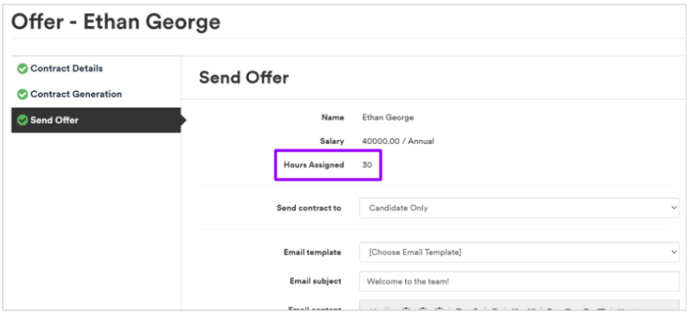
Once the offer has been generated, you will see the number of hours offered to a candidate, shown against their profile:

Please note - you may need to refresh your screen to change the number of hours assigned against the job, at the top of the screen.
As you can see, under the candidate’s name, the hours offered are showing in red.
- This text also states that the offer is ‘Pending’.
Once a candidate logs into their portal and accepts the offer, this will change:
- The candidate is automatically moved to the ‘Accepted’ bucket and their status will be displayed as ‘Accepted’, as usual.
If more than one candidate is assigned hours from within that total, you will see the option at the top of the screen change as appropriate:
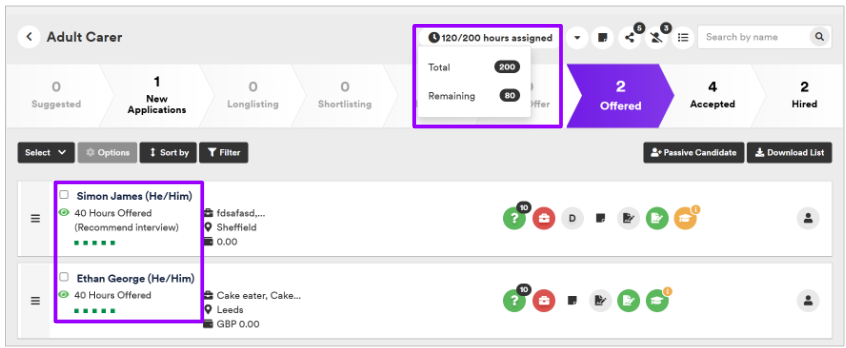
Please note - for the example above, you are seeing a remaining total different to what is on screen, as one the other hours have been allocated to candidates who are sitting in the 'Accepted' bucket.
Candidate view
When hours have been offered to a candidate, they will show under the ‘View Offer’ section on their Dashboard:
The candidate will see the number of hours assigned to them, on the left-hand side of the screen:
To accept the offer of hours, they should click on ‘Accept offer’ at the top, bottom or on the left of the screen (depending on the configuration):
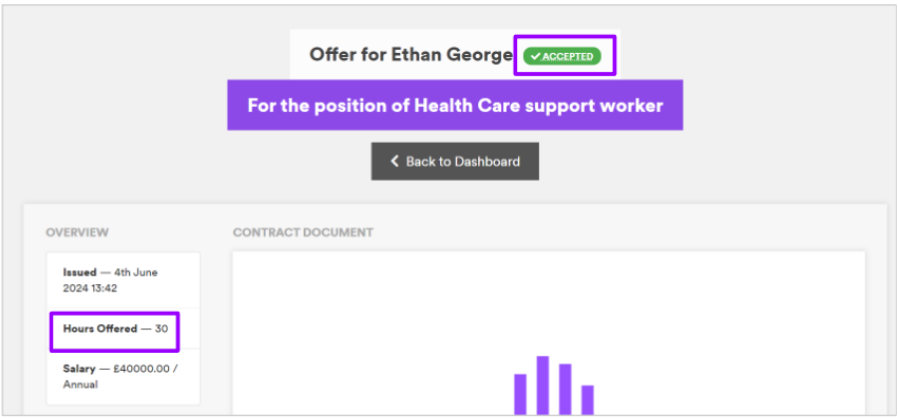
Once they have accepted the offer, they will see their offer stamped with ‘Accepted’ and the number of hours assigned to them, still visible:
Insights
The number of hours assigned to a role, can be reported on, as well as the usual Positions.
Login to Insights as usual > Navigate to the ‘Candidates’ section on the left-hand side
- Select the Application Data Capture Full report:
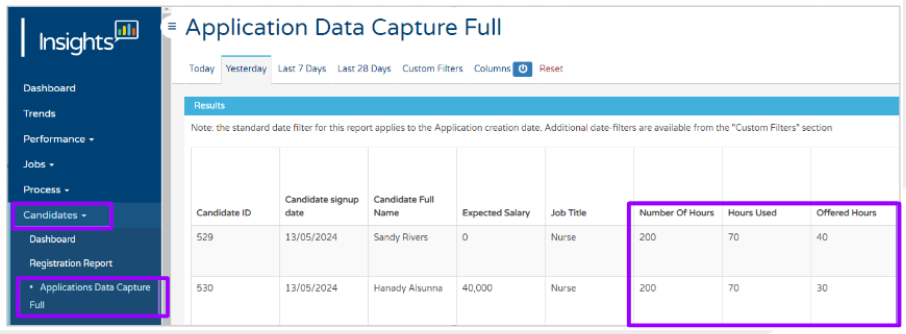
- There you are able to see how many hours have been assigned to the role and how many have been assigned to each candidate.
Please note - Each candidate is shown as a separate row in the report.
These columns will also be available to be included in a custom report, present in the ‘Standard Application Columns’ group.
Important Points to Note
- This is a Global permission and is not linked to usertype.
- The hours recruited for will only be counted when the candidate is in Offered, Accepted or Hired status
- If they are moved to another status the hours will become available again.
- A recruiter will not be stopped from hiring if they go over the total hours linked to the job.