📆 An Introduction To Scheduling Interviews
There are 2 ways to schedule interviews with candidates;
- Invite to book
Schedule the interview slots and invite the candidate to book a date and time from the interviews you have made available to them. - Send confirmation
Schedule the interview slots, agree a date and time with the candidate then send a follow-up confirmation via email to the candidate.
You can choose to schedule interviews in advance or you can create them as you send the interview confirmation or invitation to book.
➡️ Scheduling interviews in advance
- On the final page of the job creation process once you have published the job.
➡️ Scheduling interviews from the job page.
Use this option once you know which candidate/s you want to interview.
- Select the job that you would like to schedule interviews for.
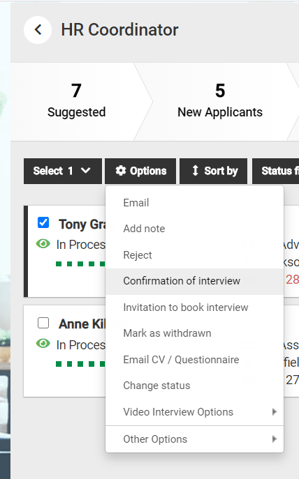
- Select the candidate that you would like to confirm or request to book an interview.
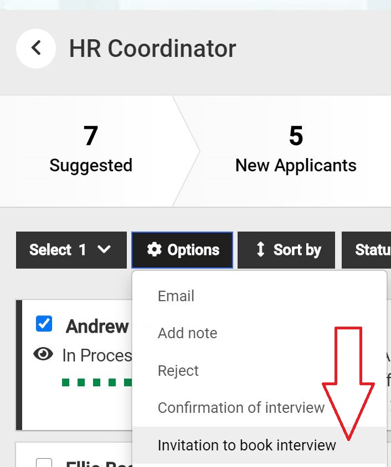
The candidate processing menu (Cog Menu) will become available.
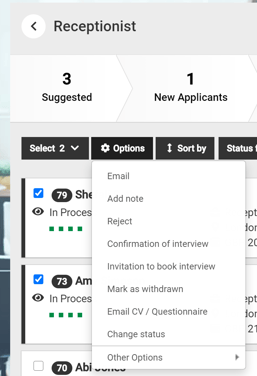
There are 2 options;
- Confirmation of interview.
If you have already agreed on a date and time with your candidate choose this option. - Invitation to book interview.
If you would like to provide the candidate/s with a list of dates and times to choose from and book on to themselves.
Once you have chosen one of the above options, you will be able to carry out the following tasks;
- Create interviews.
- Align candidate/s to interview slots that you have already created.
- Invite candidate/s to book their own interview from the interview slots you have already created.
- Send the candidate an email inviting them to book an interview.
- Send the candidate an email confirming the date and time of an interview.
- Attach interview related documents.
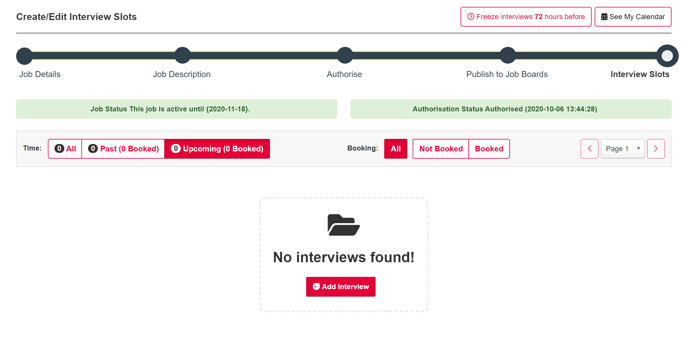
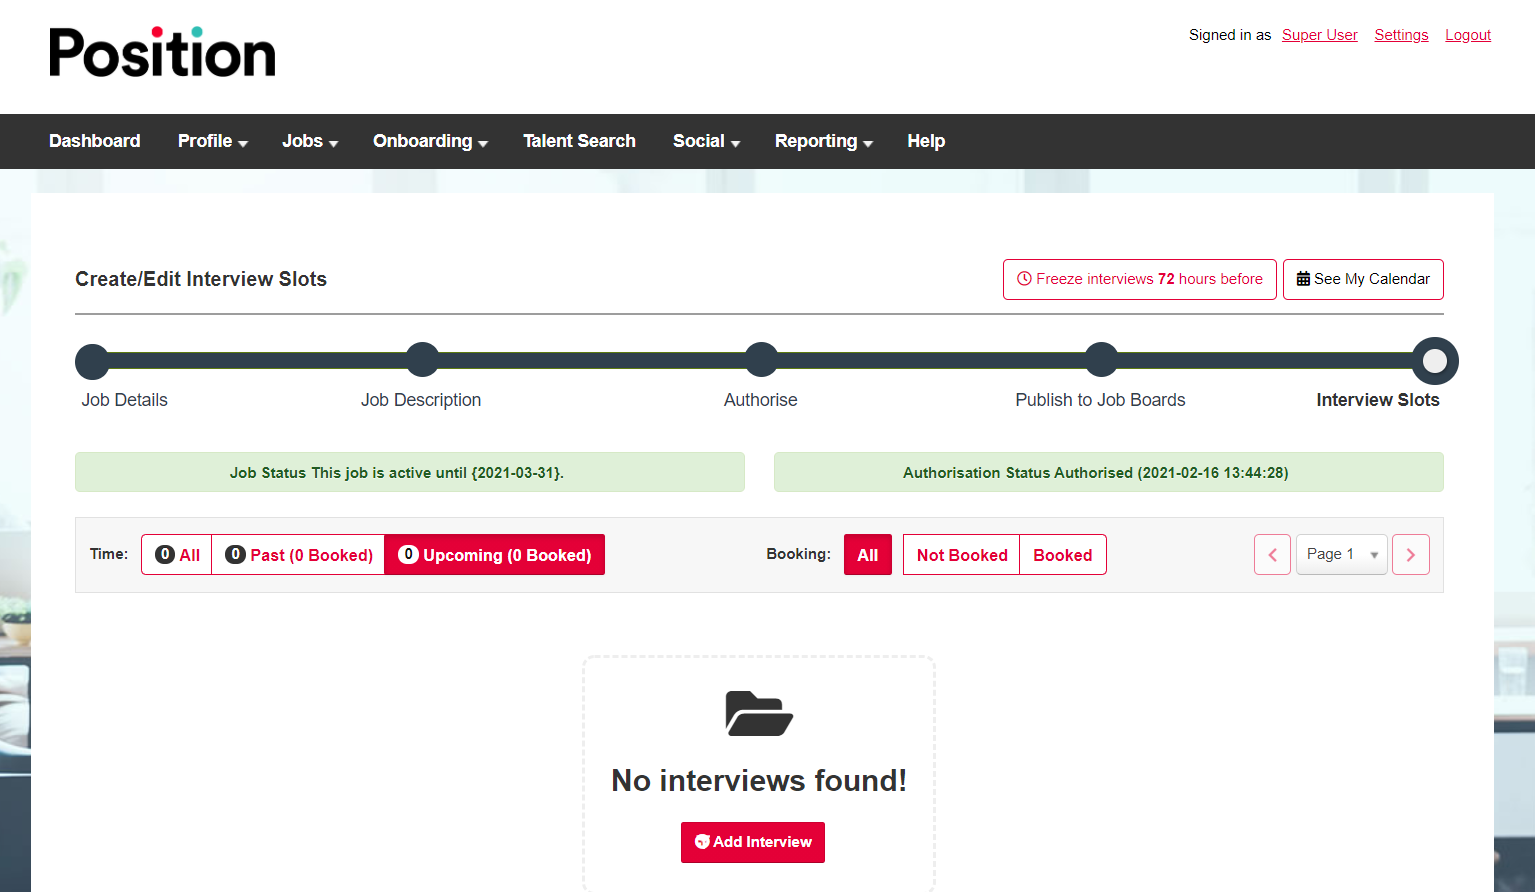
🕑 Scheduling Interview Slots In Advance
Interview Slots can be found on the final page of the job creation process once you have published a job.
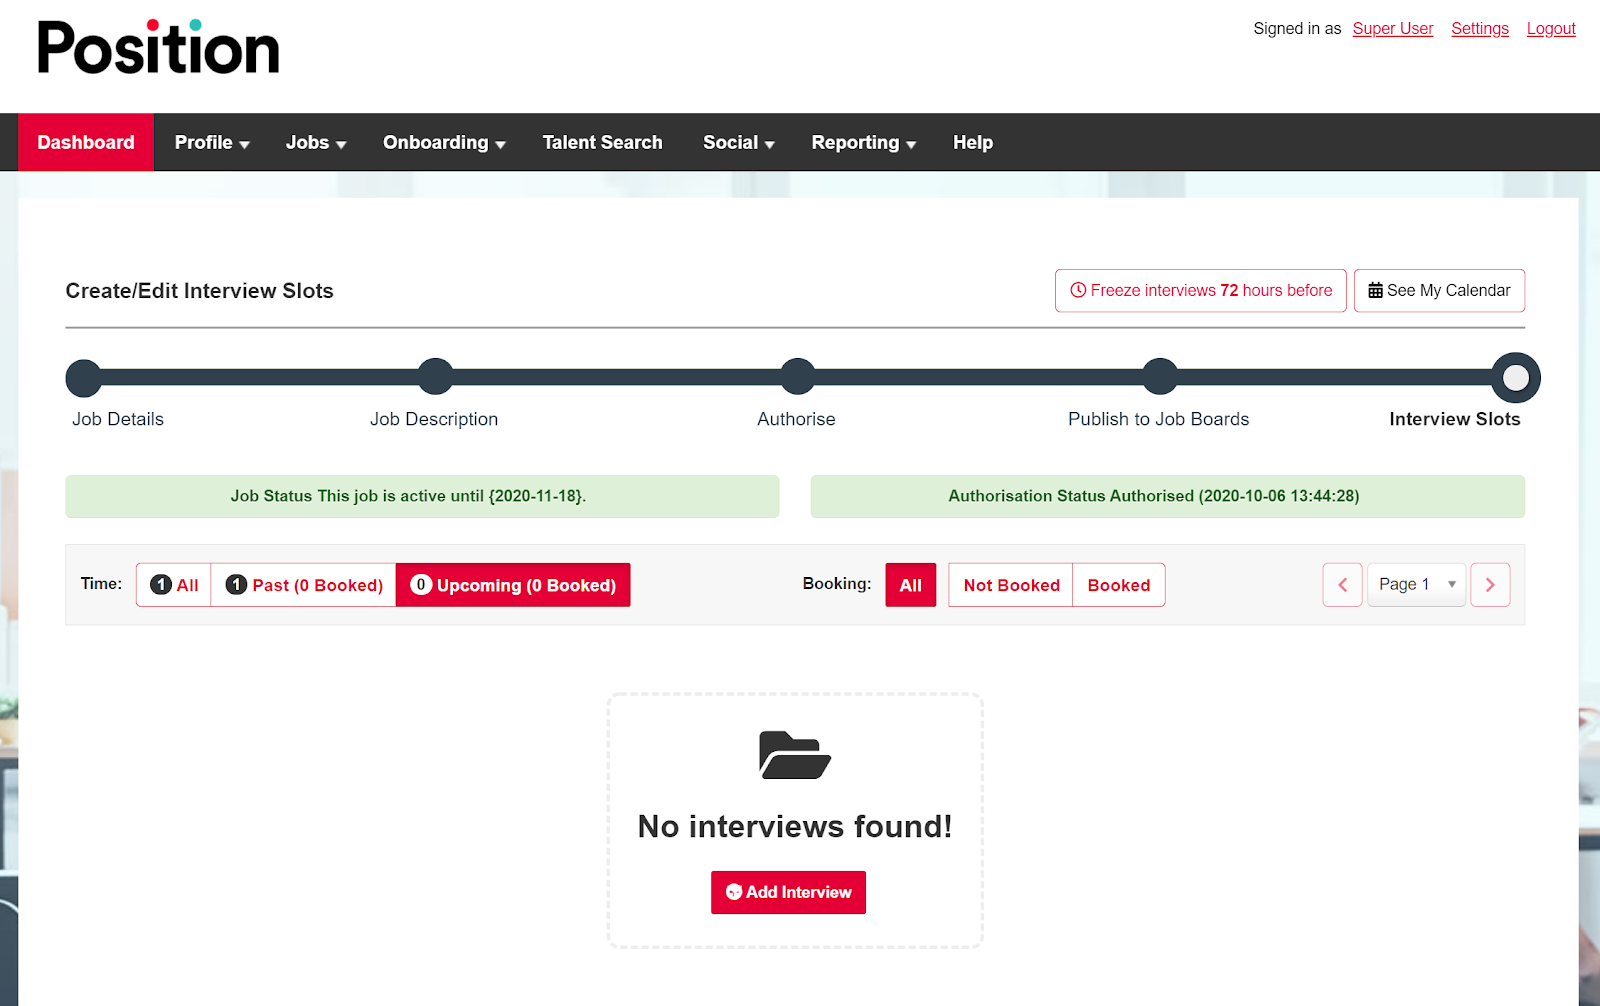

➡️ Interview slots
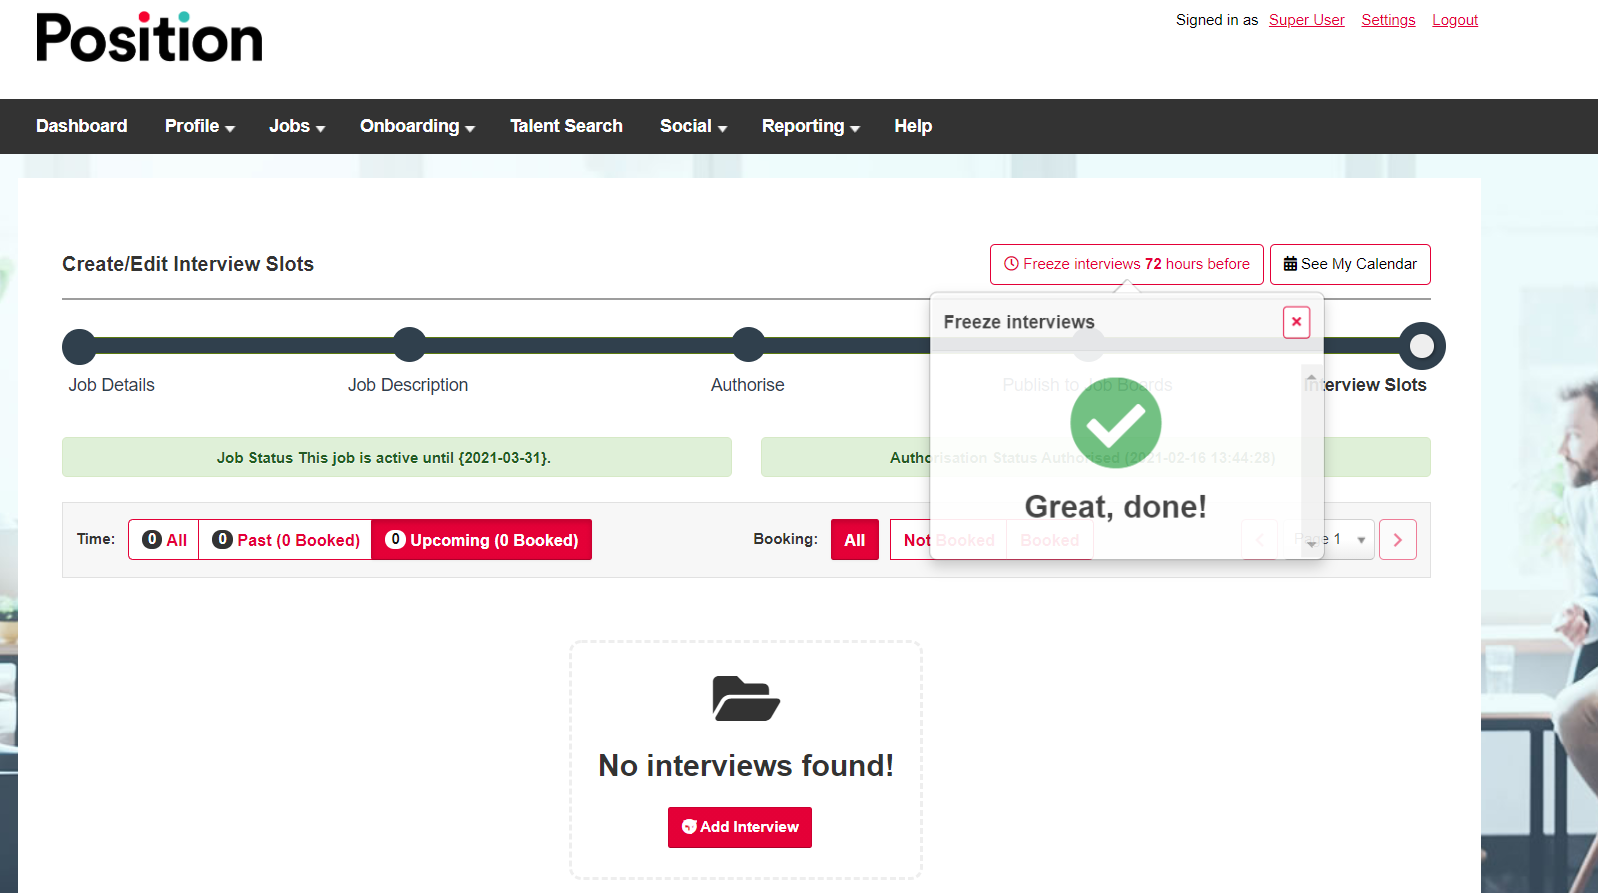
🧊 Freeze Interviews
At the top right-hand side of the screen you may see an option to 'Freeze Interviews'.
This feature helps you to ensure that you are well informed of interview bookings and re-bookings in advance avoiding last minute changes.
If you select the Freeze Interviews button a menu opens.
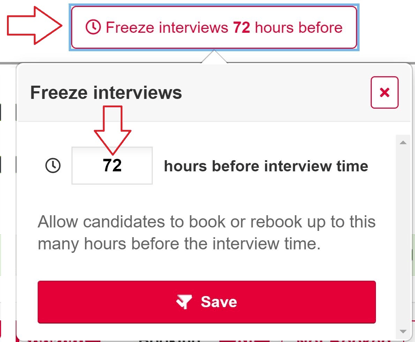
In the above example '72' has been entered manually, but what does this actually mean from the candidate's perspective?
The candidate will not know that there is a restriction on bookings and rebookings however;
- As a candidate I can only book or rebook an interview if it was longer than 72 hours from taking place.
- If the interview was due to take place in 72 hours or less I would not be able to book or rebook the interview.
📅 My Calendar
At the top far right-hand side of the screen you will see a button that says 'See My Calendar'.
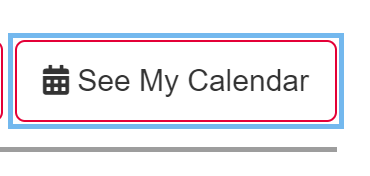
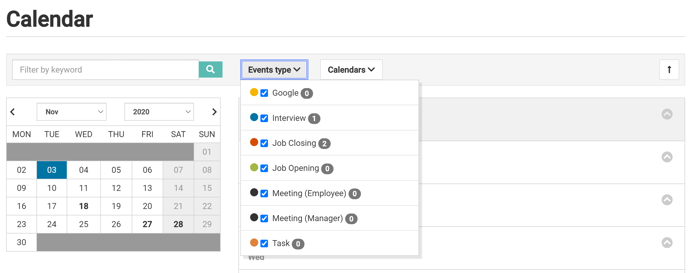
Selecting this button will take you to a calendar within the ATS;
- Select 'Events type'.
To view different events that have been scheduled including interviews.
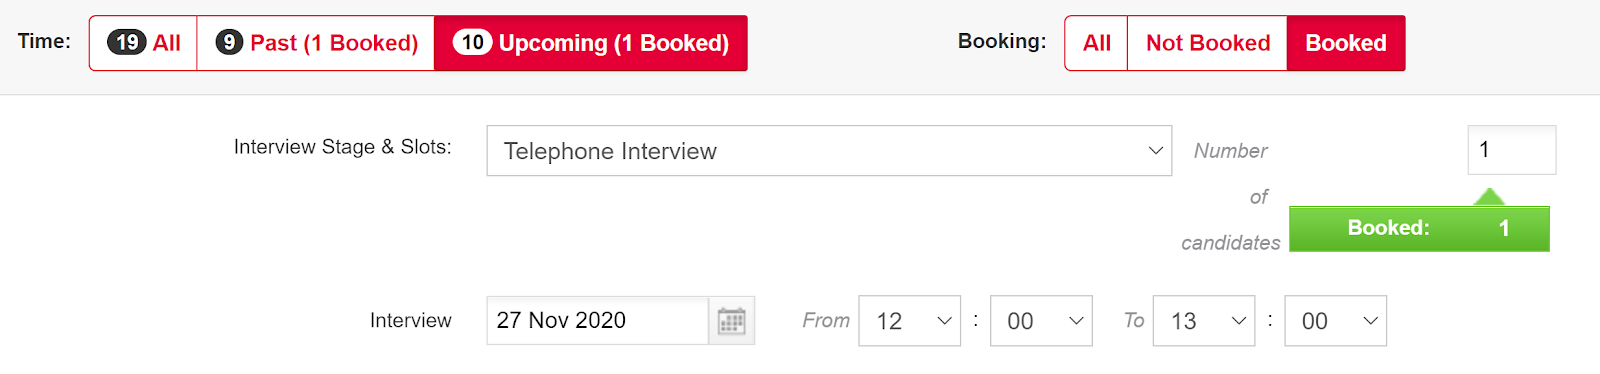
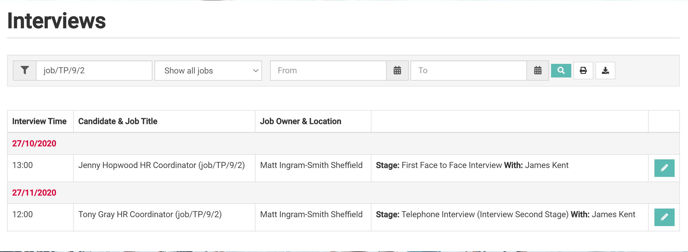
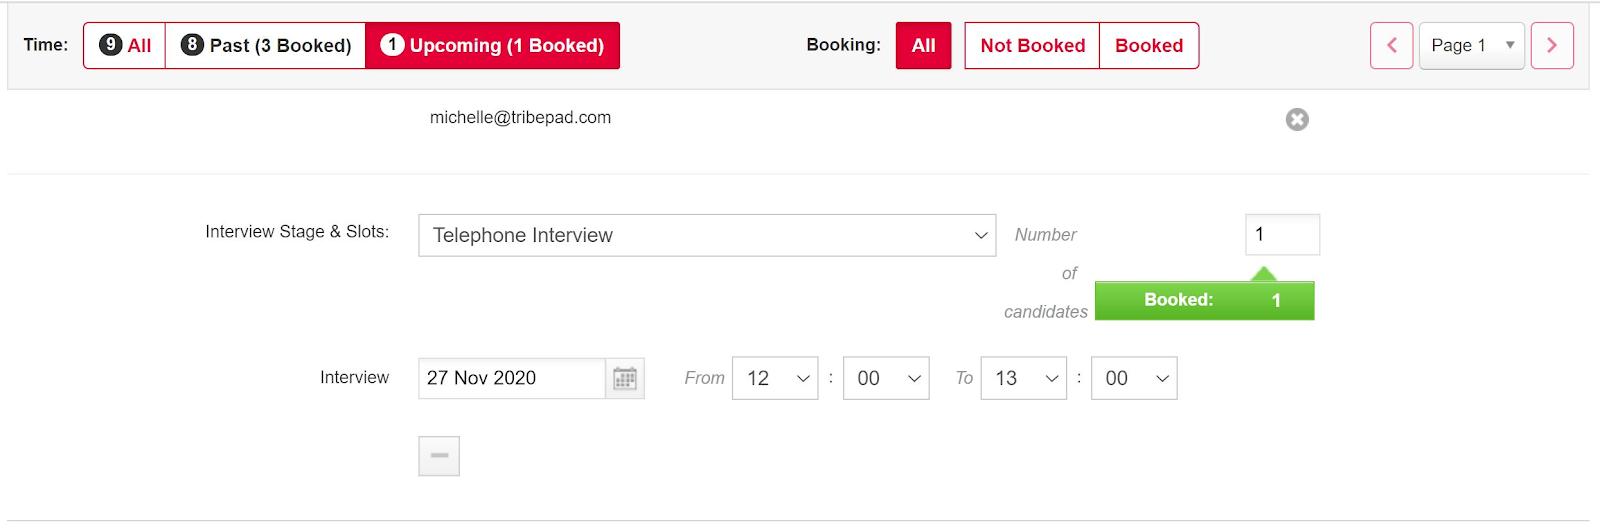
📊 Filters
If interview slots have already been created you can use the filters to see when they are scheduled for and if any candidates are booked in.
The filters allow you to look at all, past and upcoming interview slots.
The example below shows;
- Upcoming &
- Booked interviews.
➕ Adding an interview
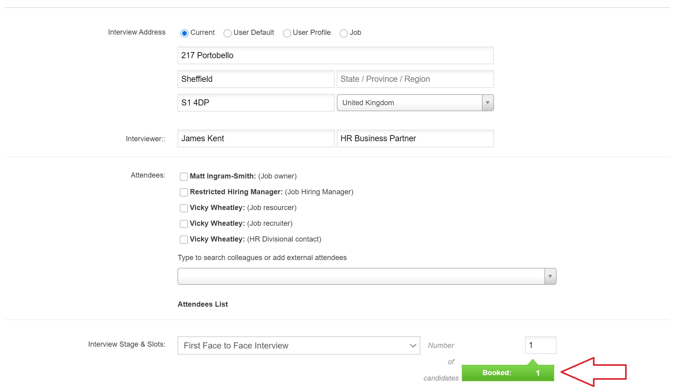
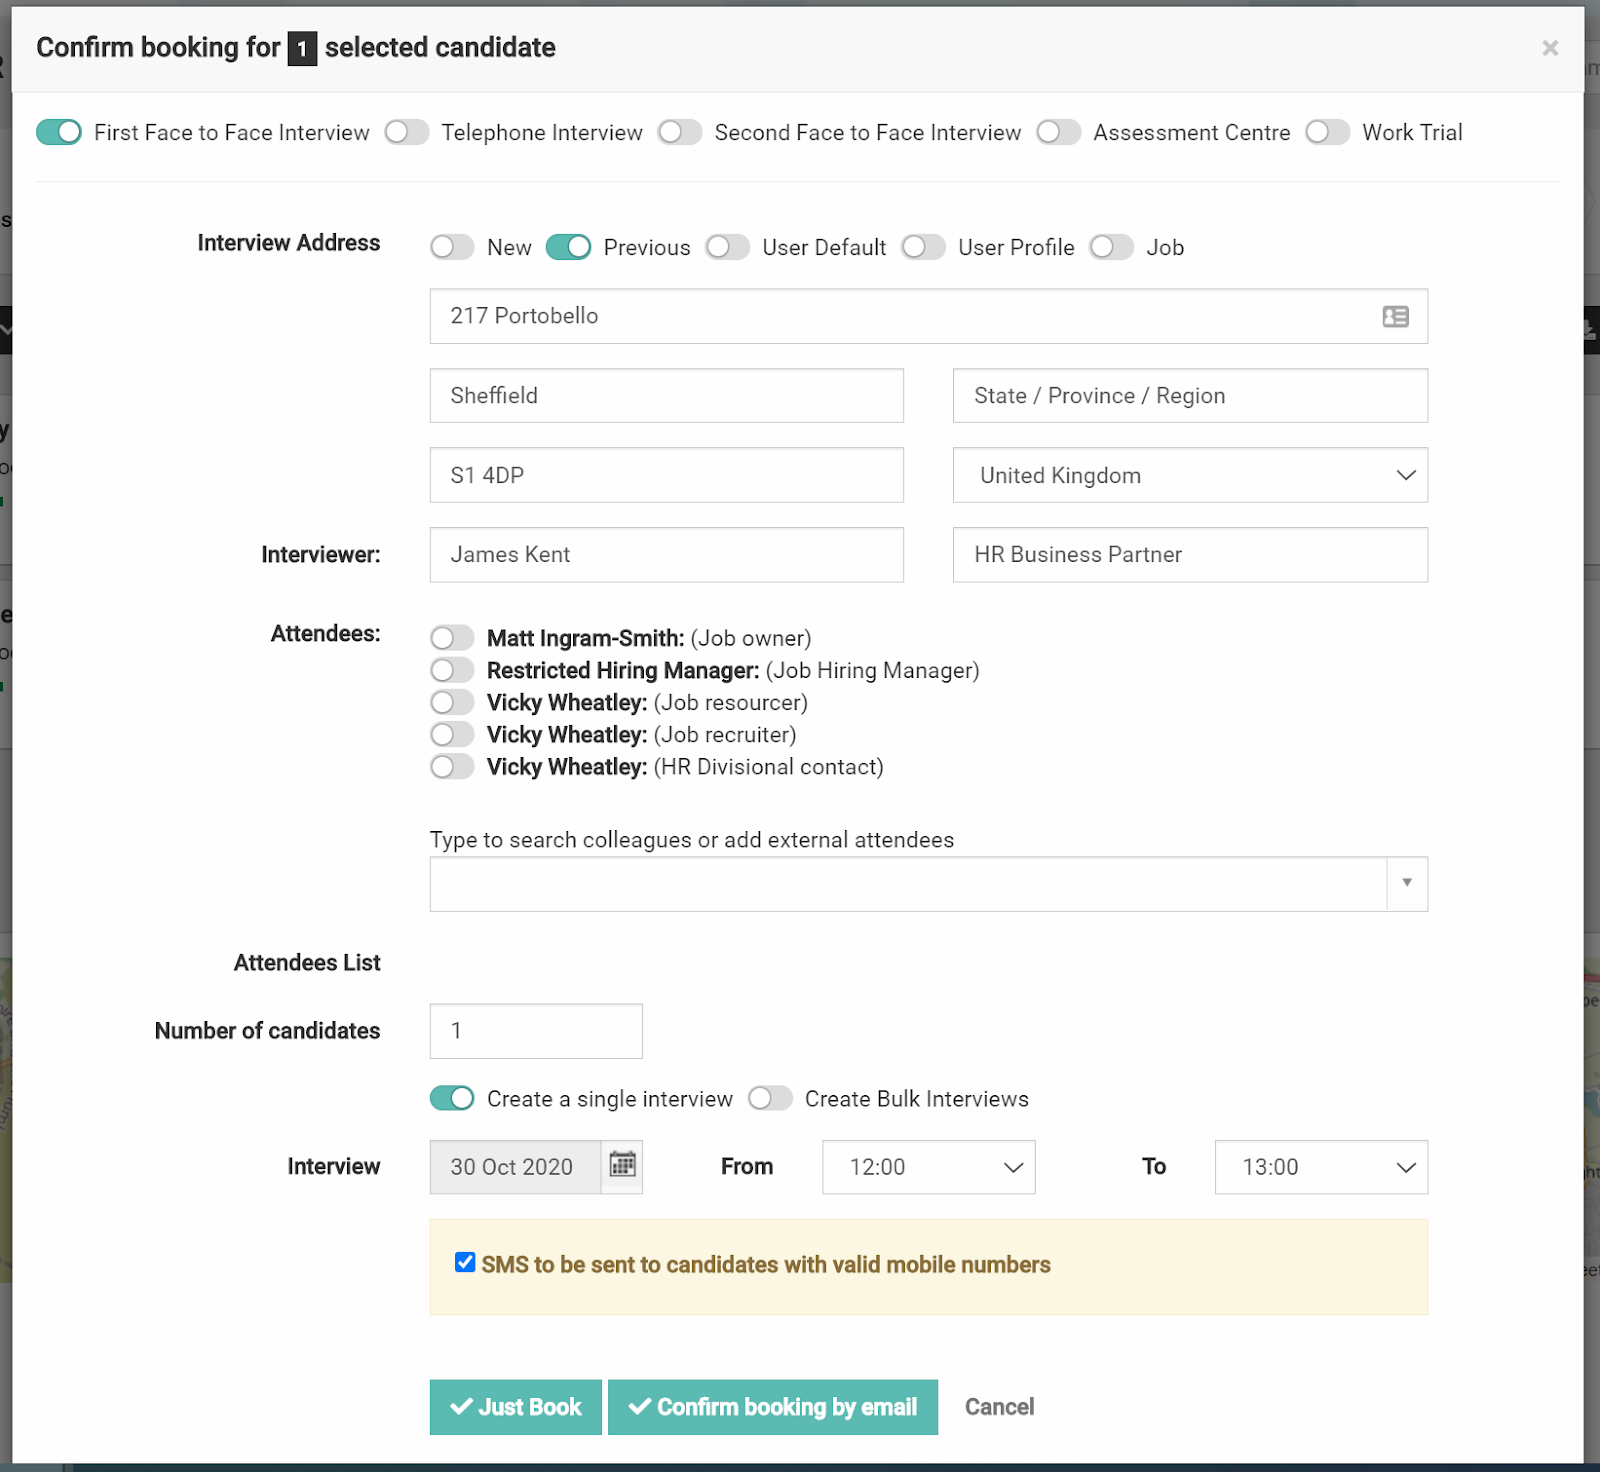
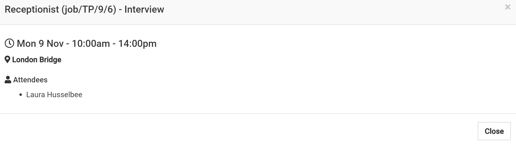
At the top you will see 'Interview Address';
- Move the radio button to the relevant option if you are inviting a candidate to a specific address. If not, you can leave this section blank.
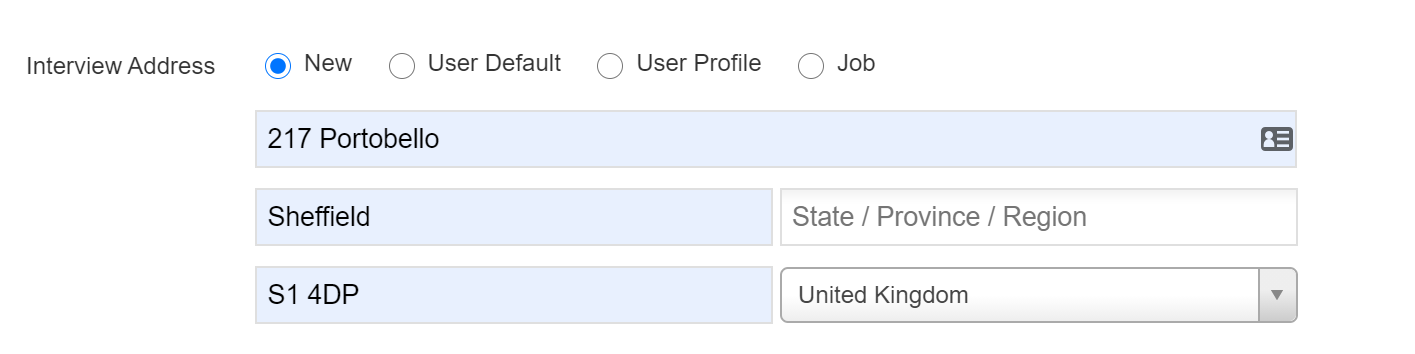
- New
Enter the address where the interview is going to take place, you will need to complete each field. - User Default
Once you have scheduled an interview with an address, the default will become that address. - User profile
If you always interview candidates at the same address, add the address to your own user profile. - Job
This address will be picked up from the address that has been added on the first page of the job creation page.- Add the interviewer name and job title.

- Add the email address of any attendee/s.
Select the check box against the 'Job owner' name if you want them to be notified of the interview once it has been booked.
The drop down list allows you to search for colleagues and/or add external email addresses that may not be present in the list.
To add an email address simply type in the field as per the example below and select enter once complete.
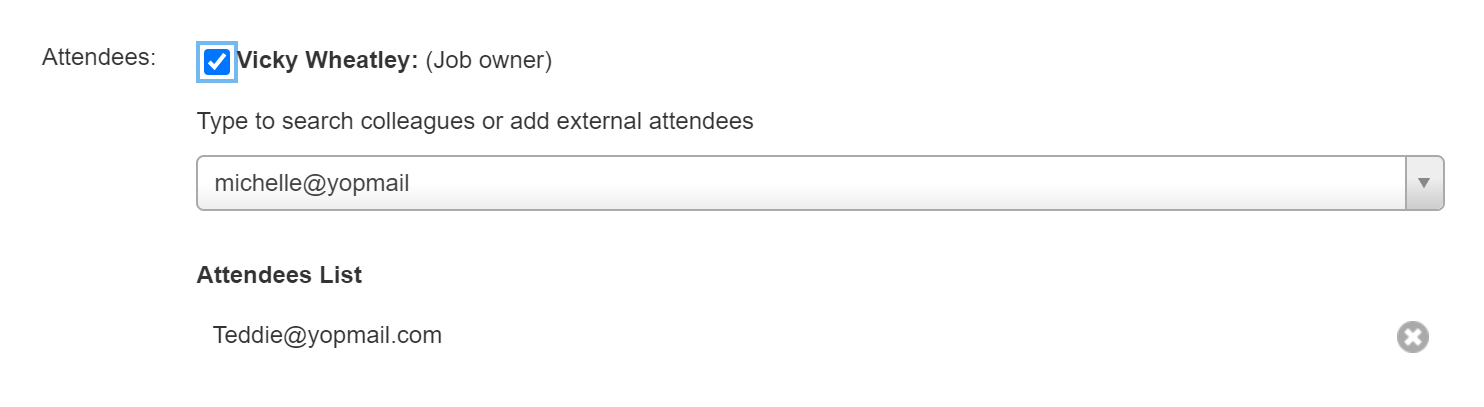
Once you have added your attendee/s you will see an 'Attendees List'.
- Choose the interview stage from the drop down menu of options.
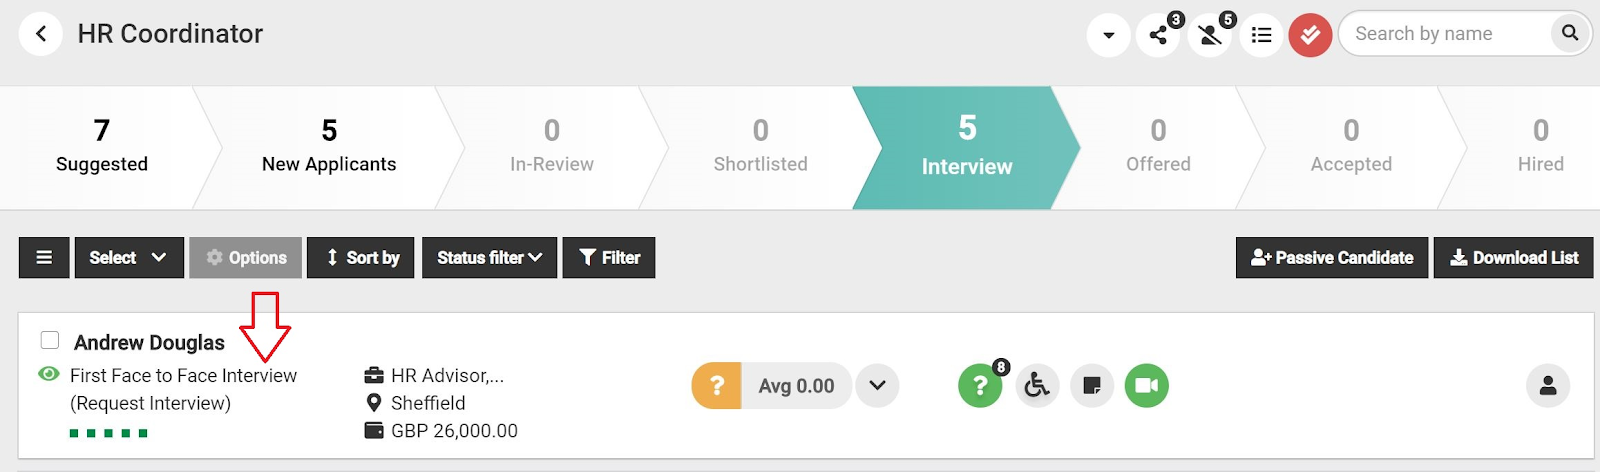
In the drop down list below there are 5 different types of interview that you can choose from, these are known as 'Interview Workflows'.
The interview workflows that you see when scheduling your own interviews will correlate to your organisation's interviewing process.
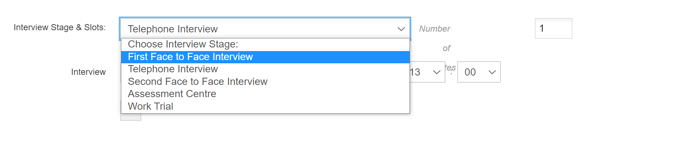
In this example 'First Face to Face Interview' has been selected.
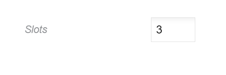
- Add the number of interview slots that you would like to create.
Example;
I arranged an interview on 31st October from 10:00 am to 11:00 am.
I have 3 Hiring Managers that are available to carry out interviews.
I can therefore create 3 interview slots allowing 3 candidates to be interviewed during the 1 hour time frame.
This is just 1 example of where you might want to create more than 1 interview slot.
- Select 'Create single interview' if you only want to create 1 interview.

- Select 'Create Bulk Interviews' if you want to create multiple interviews.
Bulk interviews are great if you want to create an assessment centre and interview multiple candidates on the same day.
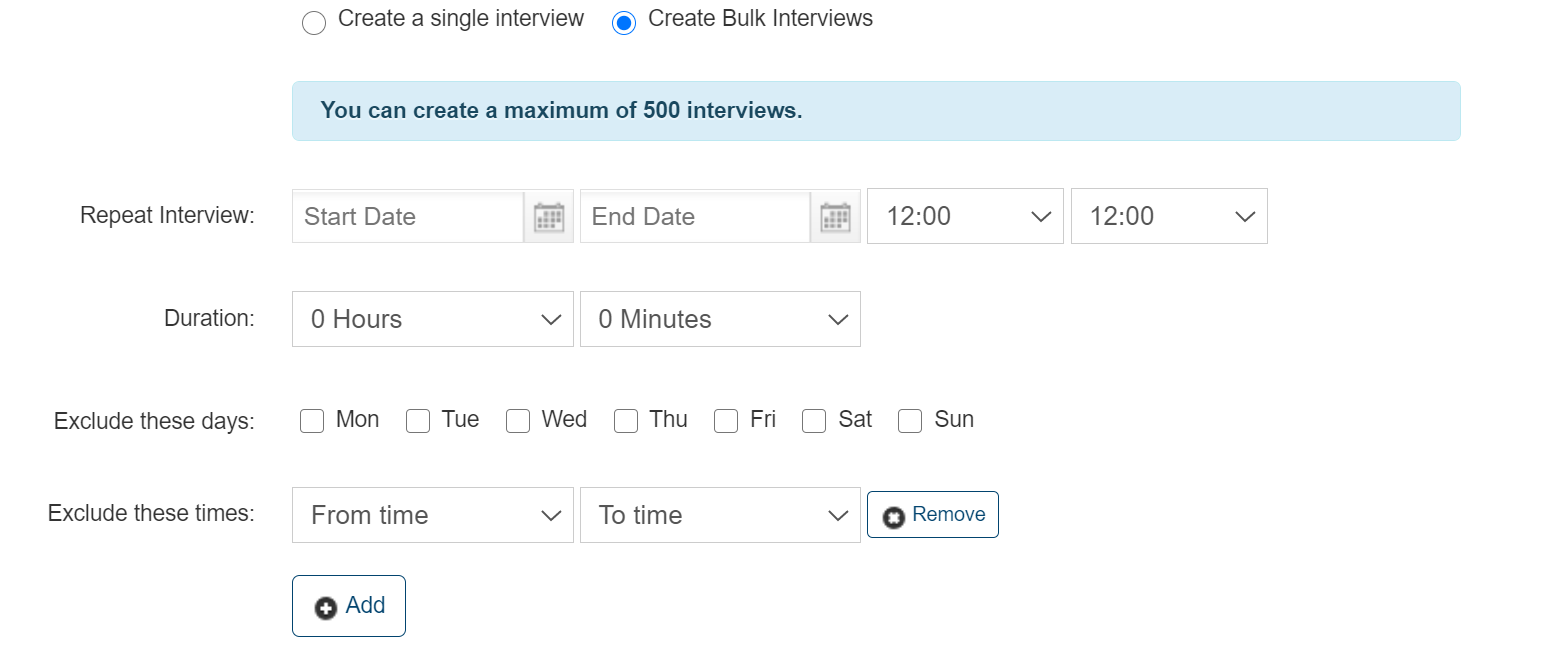
- Add a start and end date
Start and end dates could be just one day or you may be holding interviews across a number of days or even weeks. - Add a start and end time
The time frame you add here could span across a number of hours depending on how many candidates you would like to interview. - Add the duration of the interview
How long would you like to spend interviewing the candidate (e.g. 1, 2 hours etc). - Exclude these days
Are your interviews going to take place across a number of days, except for 1 particular day for example. Select the relevant day of the week here that you wish to exclude. - Exclude these times
Much like excluding certain days, you can exclude certain times to allow for a lunch or drink break for example.
Once you are happy with all of your content, select 'Save' to create the interviews.
🔄 Rescheduling An Interview
Interview schedules can sometimes change due to unforeseen circumstances or shifting availability. This guide will walk you through the steps to easily reschedule an interview within the Applicant Tracking System (ATS). There are two ways to do this: either by editing the job directly or by accessing the candidate’s options via the job list. Whether you need to adjust the time, date, location, or completely delete and reassign a slot, this article outlines how to make those changes and ensure candidates are promptly notified of any updates.
🟣 Rescheduling an Interview Via Interview Bucket On Job
To reschedule a confirmed interview, simply confirm a new interview for the same candidate at the same interview stage, by selecting the updated date and time.
This method has the benefit of automatically triggering an internal email to the interview attendees. The email clearly indicates that the interview has been rebooked and highlights both the new and original date/time, allowing attendees to update their calendars accordingly.
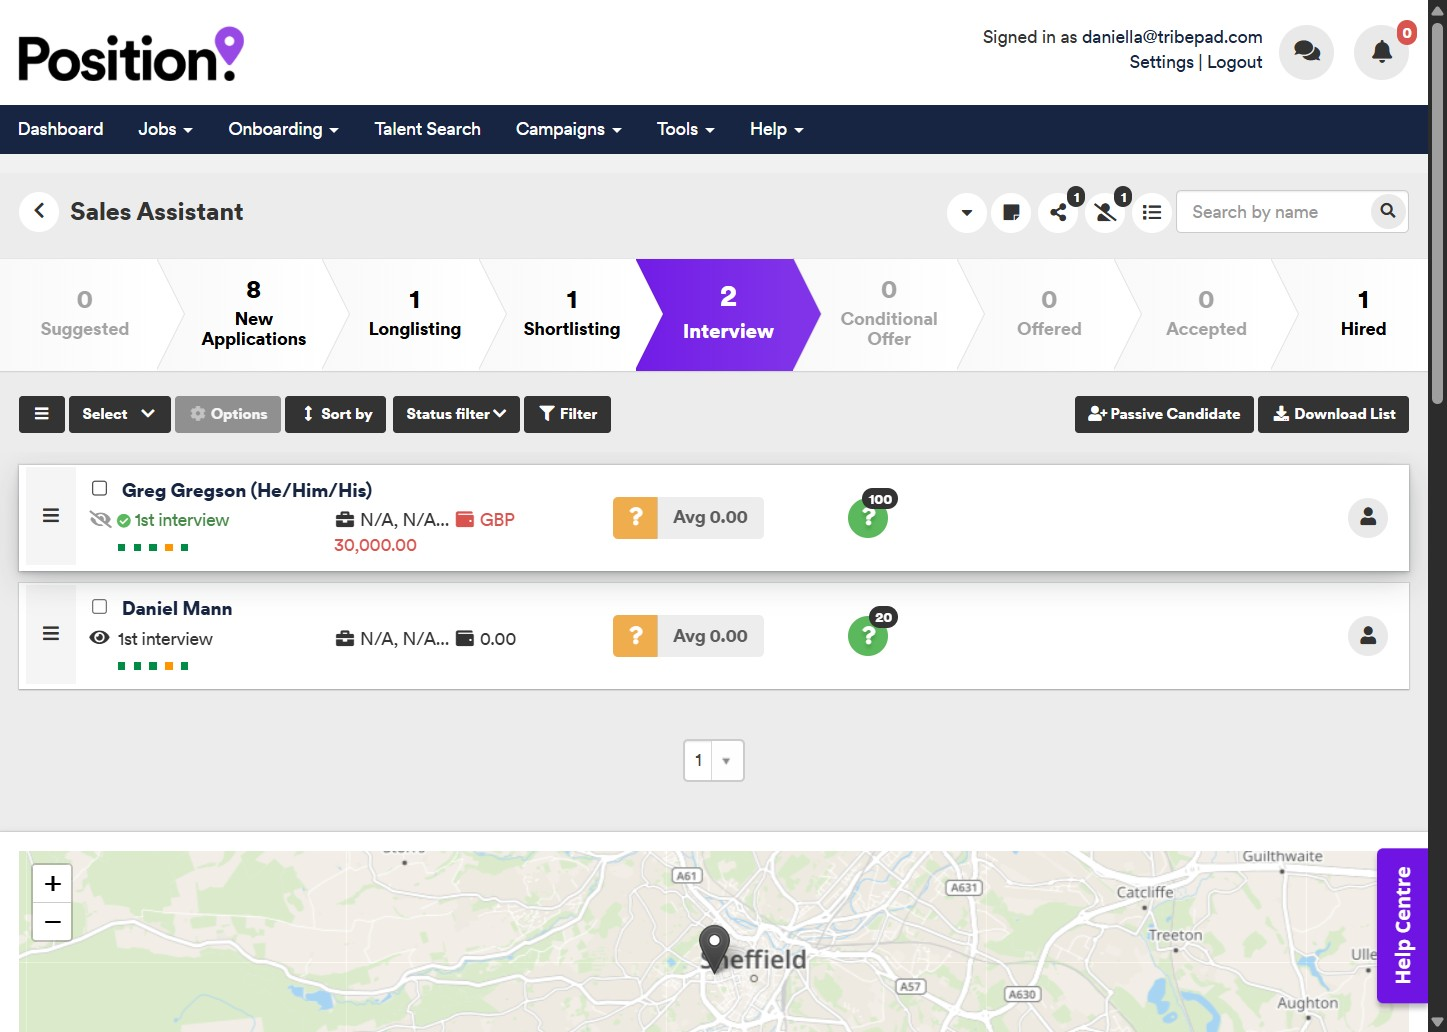
Navigate to your jobs list:

Click "Interview" on the relevant job to see candidates within this bucket:

Click the checkbox next to the candidate's name.
Click "Arrange an interview":
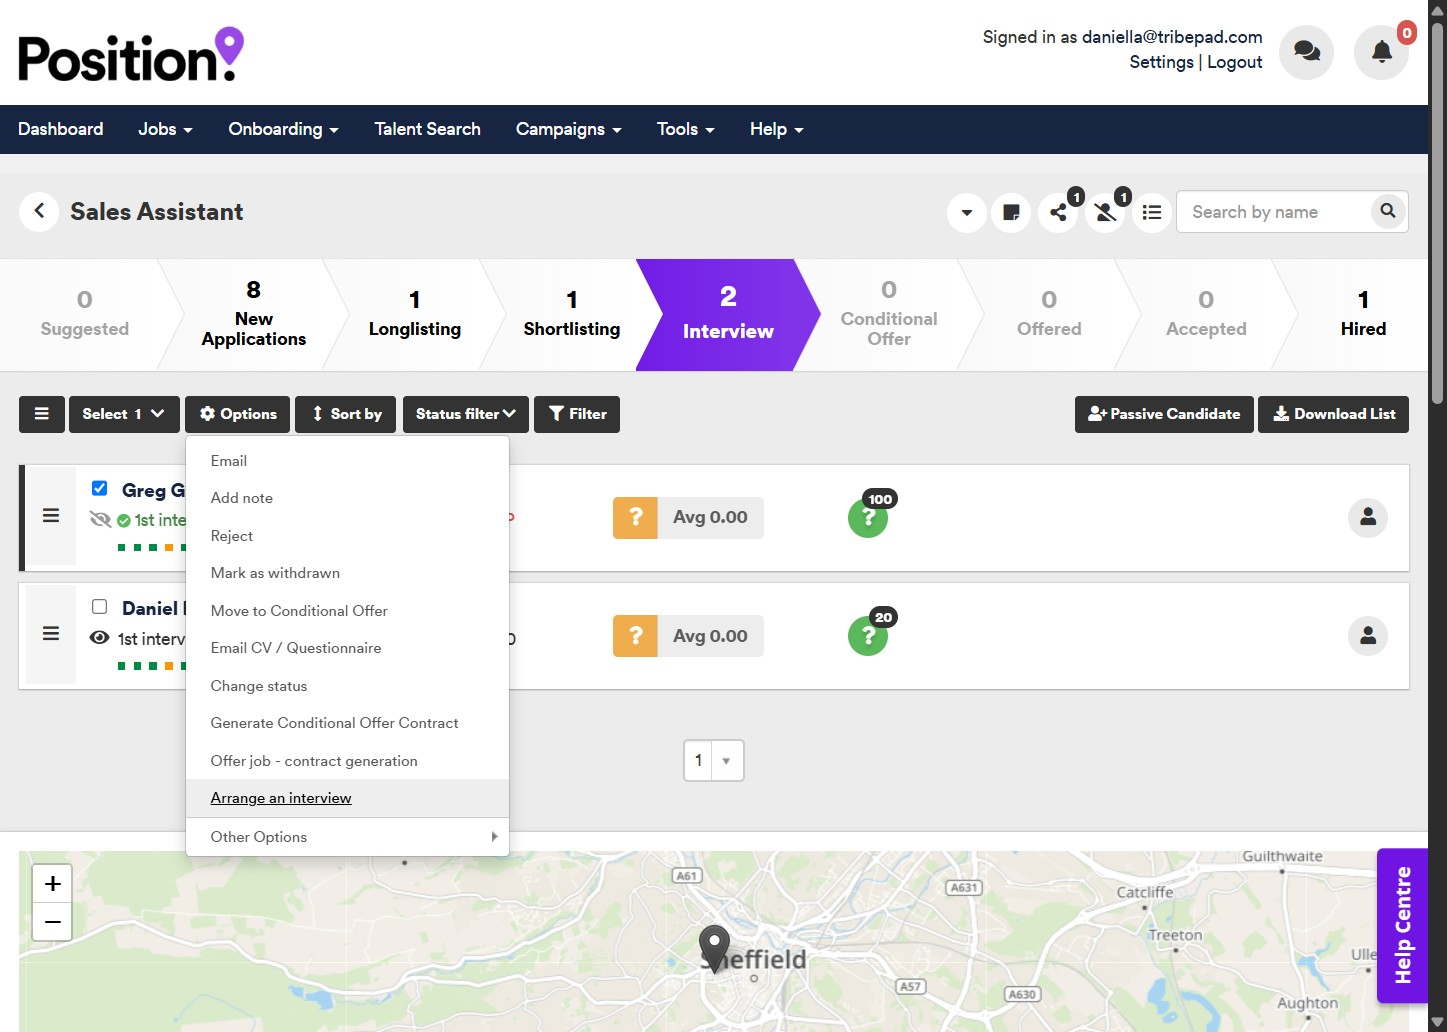
Click "Book interview":
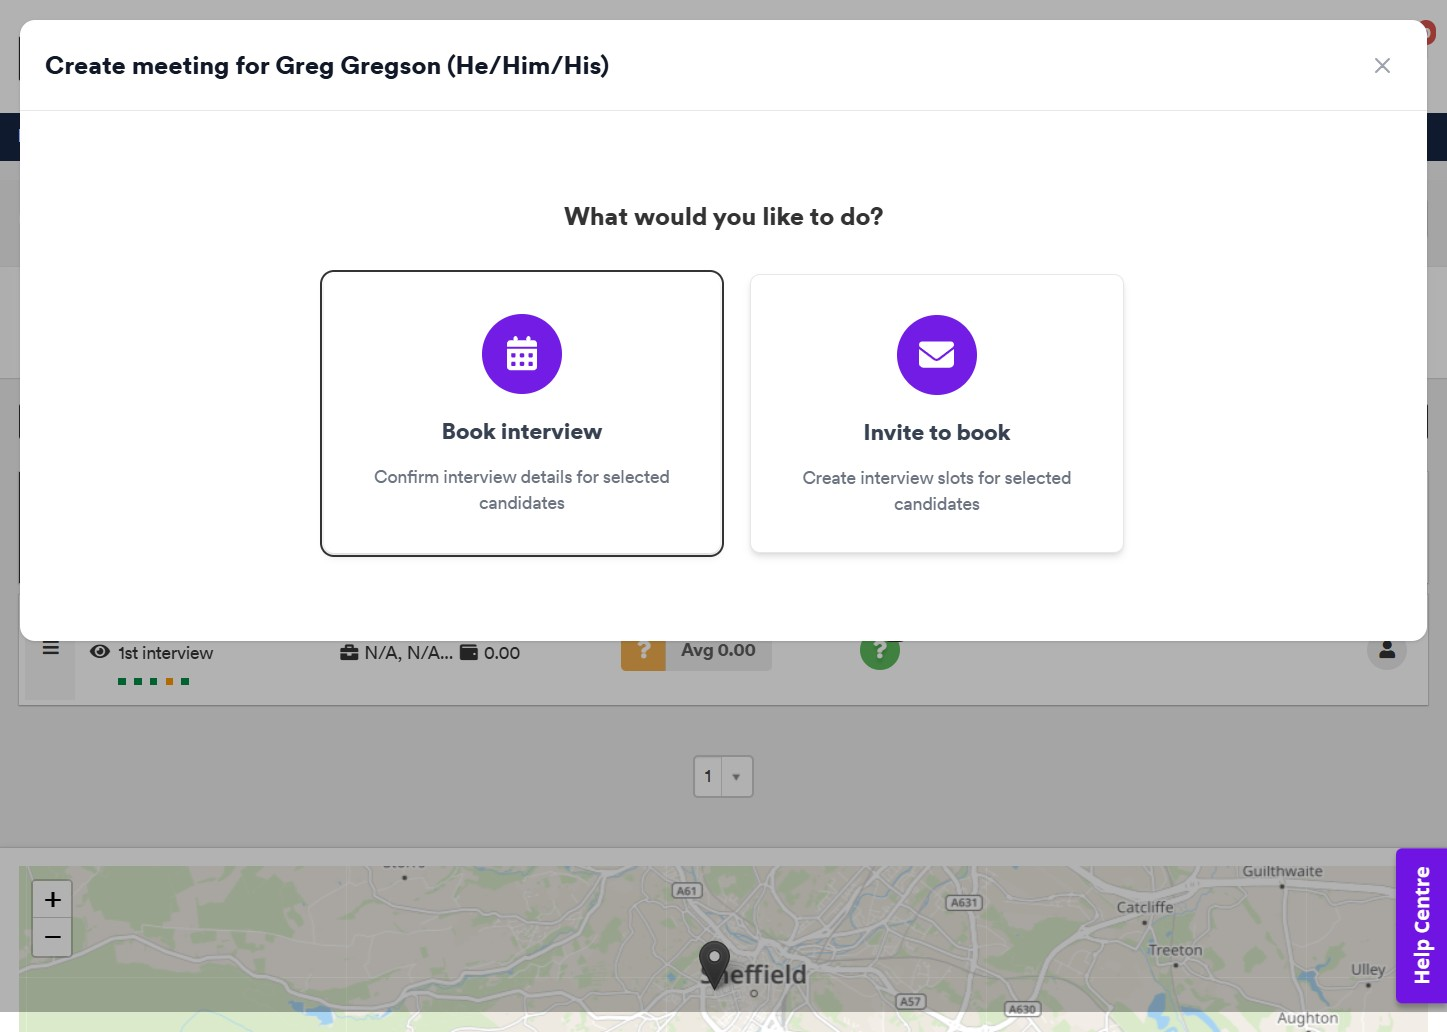
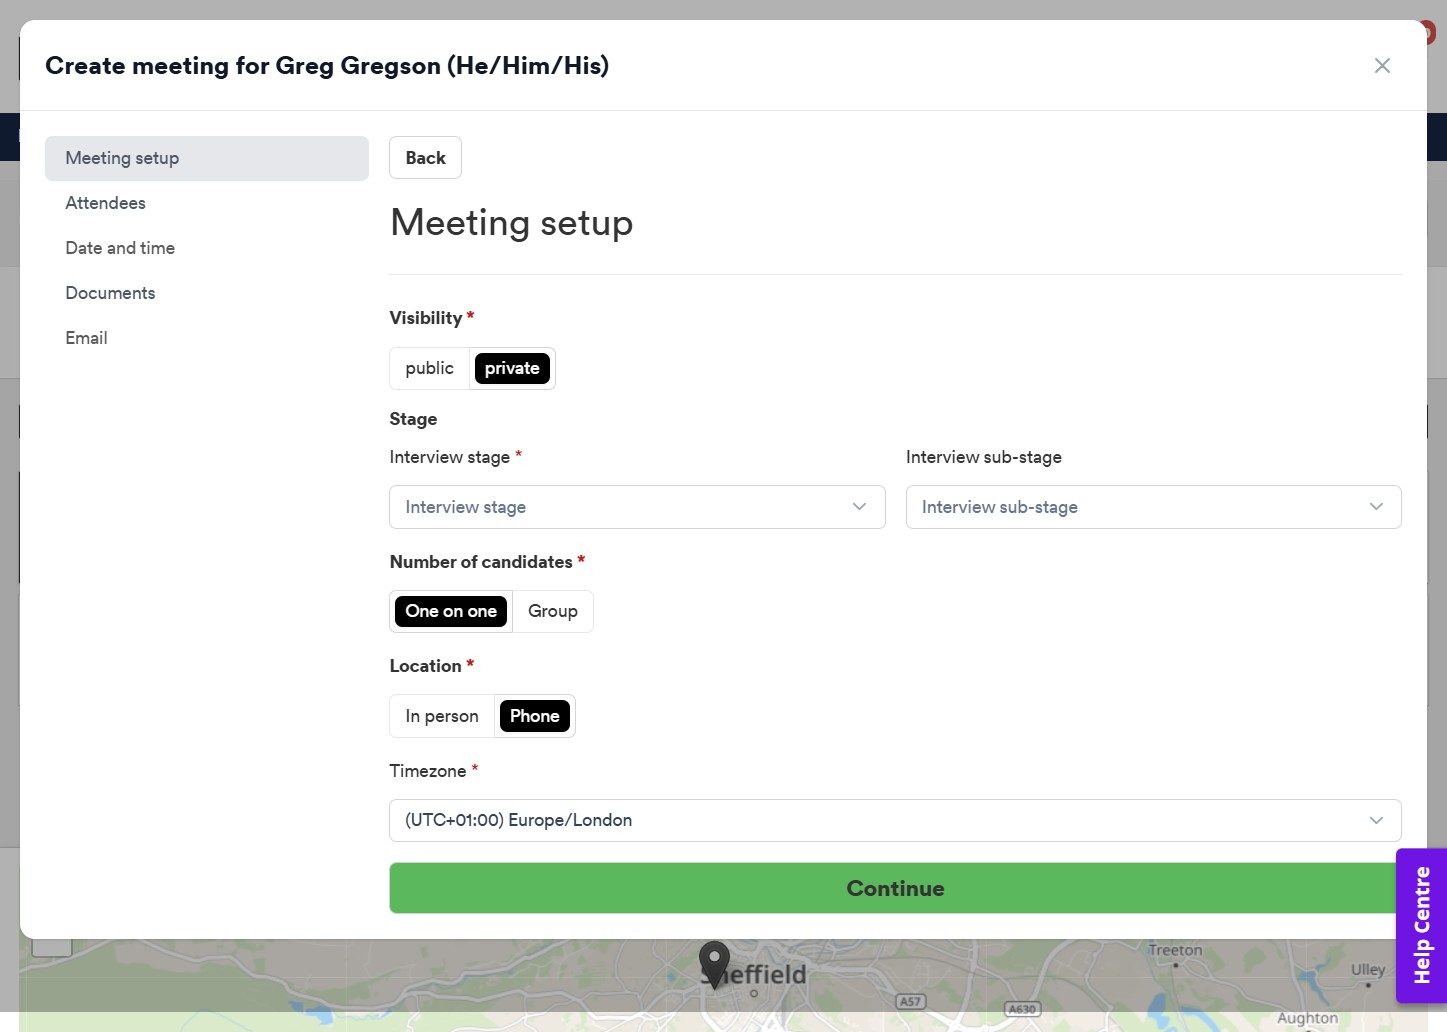
Update/Edit the relevant information throughout the booking process:
‼️Please note: This process does not trigger a rebooking email to the candidate. Therefore, to ensure candidates are properly informed about this rebooking and to tailor the content accordingly with the new interview time etc, an ad hoc email template can be created.
This template can include tags that automatically pull in the new interview details, including the updated date and time.
Be sure to use this template when manually notifying candidates of any rescheduled interviews.
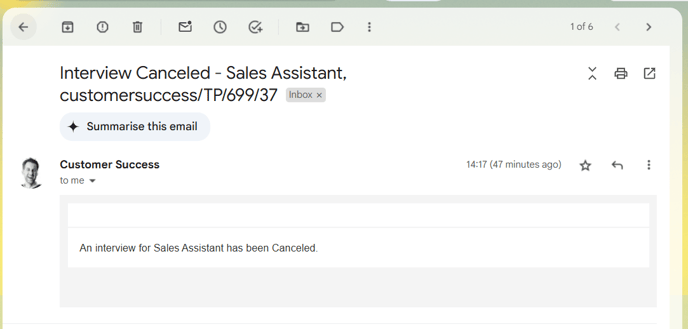
See below for an example email seen internally by any interview attendees notifying them of the cancellation to the original time and date:
⚫ Reschedule Via Edit Job
To change an applicant’s interview slot:
- Select the 'Edit' option for the job on any application stage in the ATS.

- Select 'Interview Slots' from the Job Editor bar.

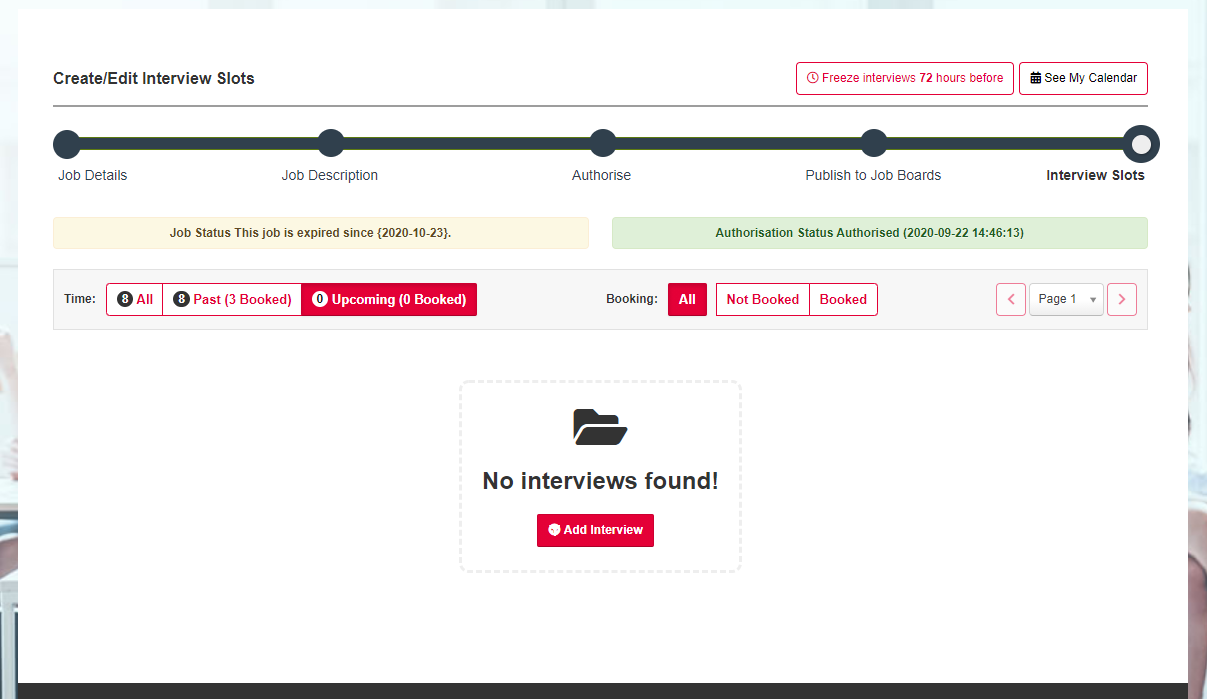
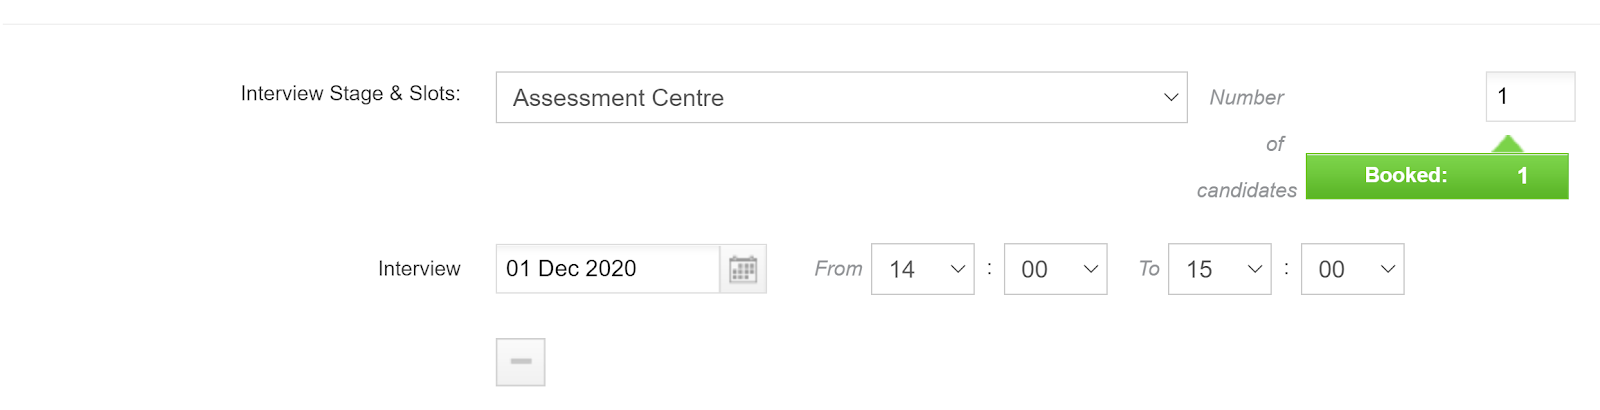
You will be presented with a screen that shows your interview availability and bookings.
Bookings are highlighted in green.
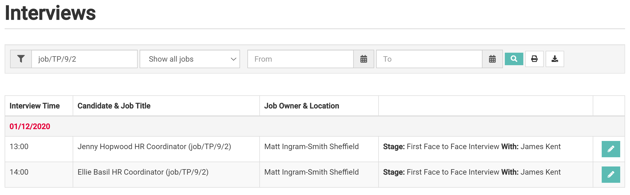
- Select the number next to the wording 'Booked'.
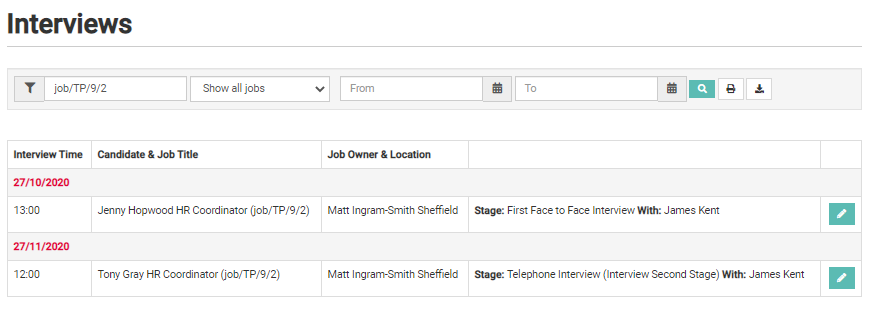
You will be presented with details of the candidates that are booked for an interview for that particular job.
The interviews are listed by:
- Interview Date & Time.
- Candidate Name & Job Title.
Select the candidate name to view their personal profile.
Select the Job Title to be taken to the job view. - Job Owner & Job Location.
- Interview Stage.
To the far right of each candidate there is an edit icon:
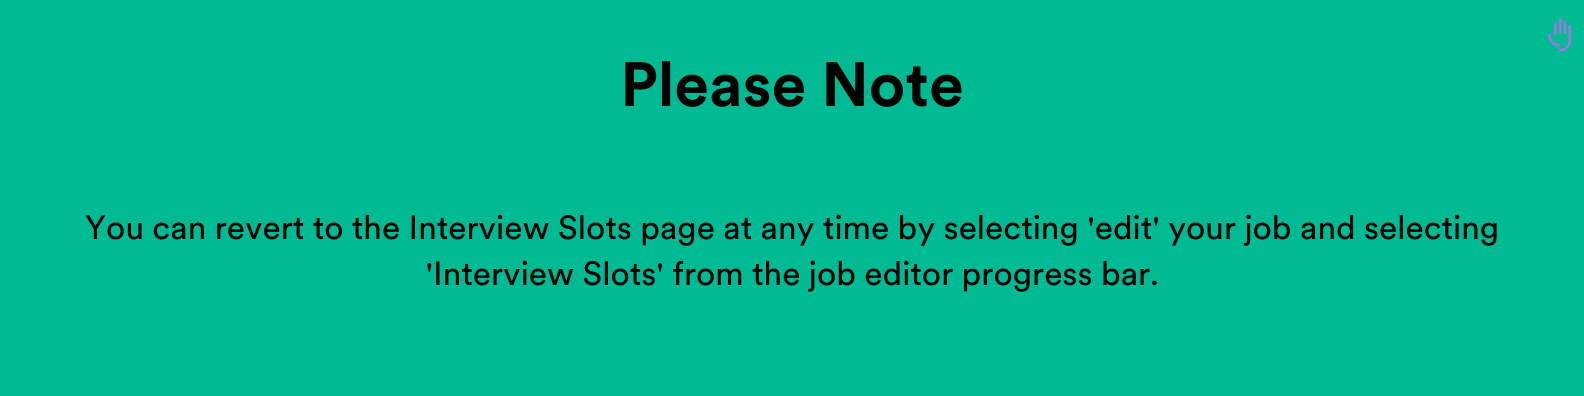
- Select the edit icon to revert to the interview slots page.
- Locate the relevant interview.
⚫ Edit an interview slot
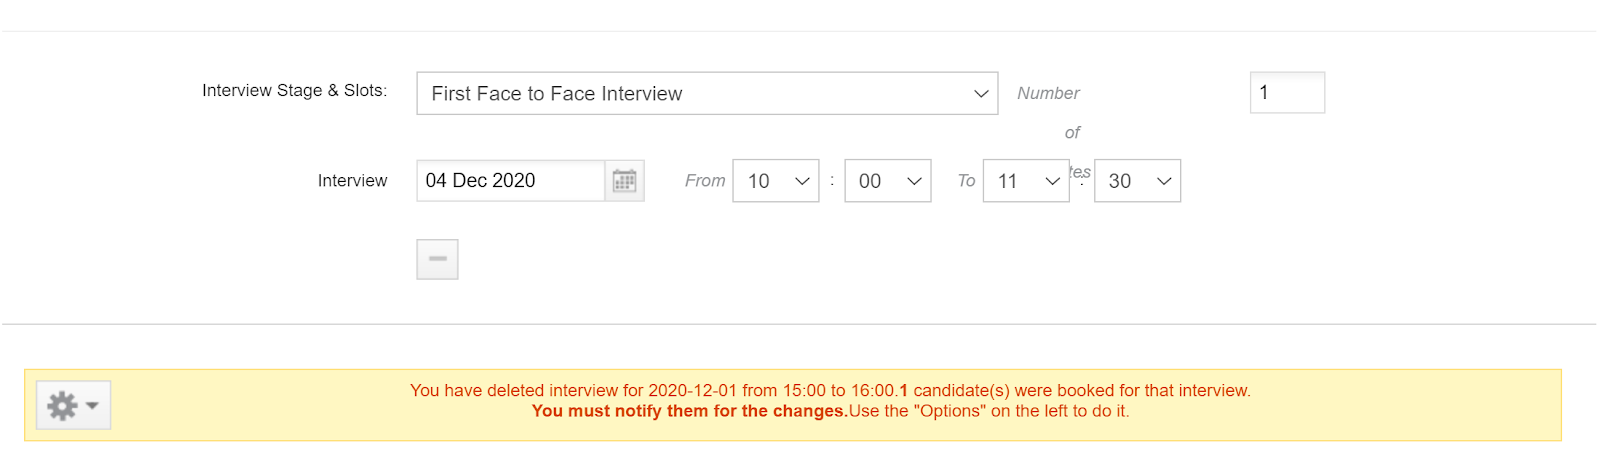
You can edit any of the fields shown for example, you may want to change the interview address or change the date and time of the interview.
- Select the relevant field/s & replace it with your changes.
- Scroll to the bottom of the page and select 'Save'.
You will be presented with this yellow banner at the top of the page advising you that you have made critical changes and to scroll down to the relevant interview to notify the candidate/s.
- Scroll down the page until you reach the interview you changed and you will see another yellow banner.
- Select the grey cog icon on the far left of the yellow banner.
- Select 'Email Candidates' to be taken to the job view.
- Select the candidate and use the options menu to contact the candidate.
You could choose to email the candidate or send another invitation.
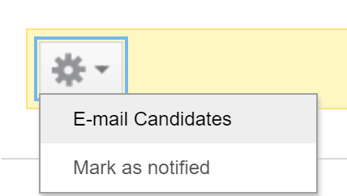
- Select 'Mark as notified' to remove the yellow banner.
Only do this once you are happy that you have notified the candidate.
If you would like to reschedule the interview, you can create additional interview slots and invite a candidate to book their own interview or send interview confirmation if you have already agreed on an alternative date and time.
⚫ Delete an interview slot:
- Select this icon
to completely remove the interview.
You will be presented with a pop-up.
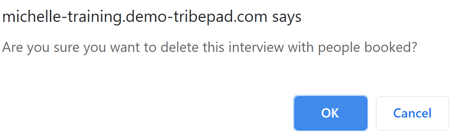
- Select 'OK'.
A yellow banner will appear advising you that you have deleted an interview allowing you to notify the candidate by;
- Selecting the grey cog icon on the far left of the yellow banner.
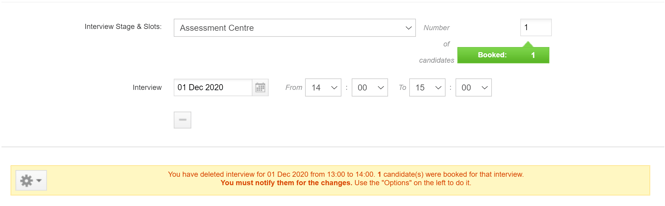
- Select 'Email Candidates' to be taken to the job view.
- Select the candidate and use the options menu to contact the candidate.
You could choose to email the candidate or send another invitation.

- Select 'Mark as notified' to remove the yellow banner.
Only do this once you are happy that you have notified the candidate.
If you would like to reschedule the interview/notify the candidate of the changes:
- Create additional interview slots and invite a candidate to book their own interview.
- Send interview confirmation if you have already agreed on an alternative date and time.
- Send an email to advise of the changes.
❄️ How To Freeze Interviews
This feature allows you to specify the time period that a candidate has to book or re-book an interview, preventing last-minute and unexpected changes to your schedule.

This option can be changed on a per-job basis and all recruiters have the option to amend the hours by just clicking the freeze interview icon located on the 'Interview Slots' page.
Once clicked the recruiter must add in the hours that candidates have to book or rebook an interview before the start time of the first interview that's arranged.

Once the hours have been entered the recruiter would just need to click save and that information is saved to that role. The recruiter could allow candidates to be able to book or rebook interviews a day before or even hours before the first interview time.
Once the hours have been saved the recruiter would see a green tick in that section to show this has been amended.
This would allow the candidate to log in to their own dashboard and book/re-book interview within the time frames set in the freeze interview feature.
📩 Invite Candidates To Book An Interview
This section explains how you can schedule and invite candidates to book their own interview from the dates and times you provide.
- Select the candidate/s that you would like to invite to book an interview.
You can do this by selecting the check box next to the candidates name or anywhere within the outlined box that surrounds the candidates details.
A pop up will appear.

Across the top of the pop up you will see;
- A heading that confirms how many candidates have been selected.
In the above example 3 candidates have been selected. - The different type of interviews that you can invite a candidate to.
All of the different interviews shown in the above example make up 1 'Interview Workflow'.

To learn more about interview workflows, see our other guidance here🖱️Interview workflows
- Select the toggle against the relevant interview.
In the below example 'Telephone Interview' has been selected and you can see that an interview slot has been scheduled in advance and is still available to select.
- Select the toggle against the interview that is available if it is relevant.

If you haven't yet scheduled any interview slots or you want to add some more, you can do that now.
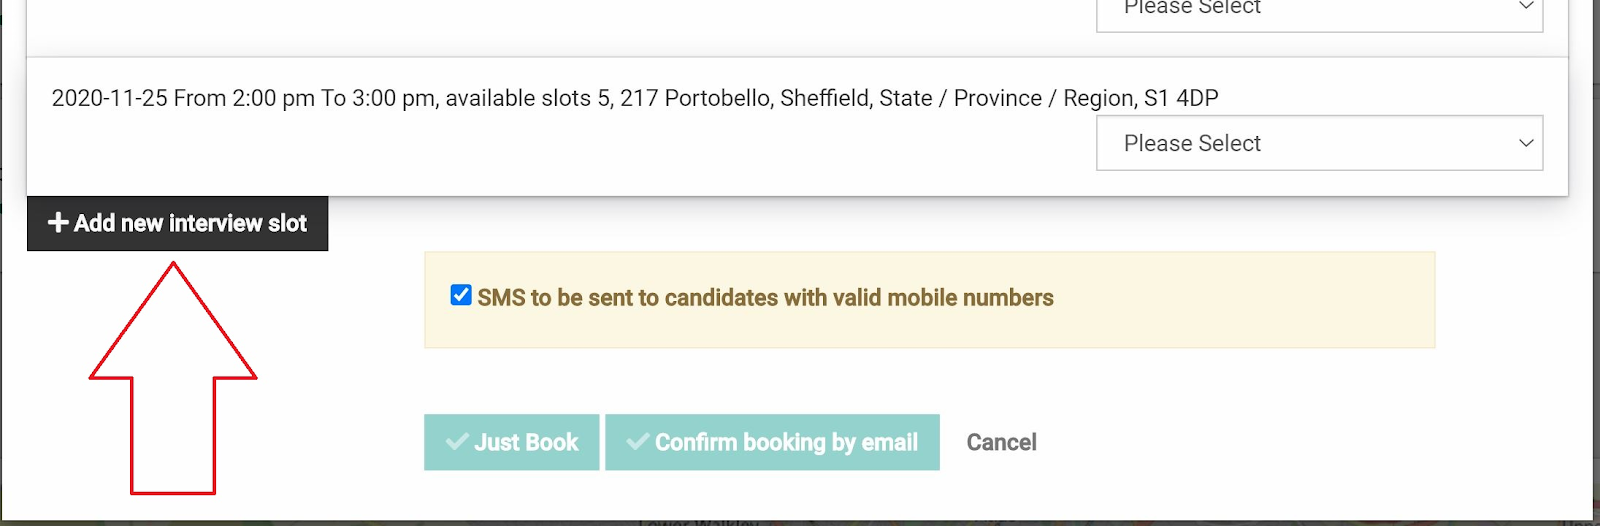
- Select 'Create more interview slots'.
If you have selected more than 1 candidate and you have already scheduled a number of interview slots in advance you will be able to see the total number of interview times available.

If you would like to schedule more interview slots;
- Select '+ Add new interview slot'.
You will be presented with a pop up;
If you have chosen an interview workflow that requires an address (i.e. face to face rather than a telephone interview). You can select the relevant toggle to;
- Automatically populate the interview address or;
- Add it manually.

- Interviewer:
Add the name and job title of the interviewer. - Attendees:
These are the names of any users that have been assigned to the job during the job creation process. Select the toggle next to the relevant attendees if applicable and search for other colleagues in the search bar or type in an external email address. - Number of Candidates:
This should always be 1 when confirming an interview. - Interview:
Select the date of the interview, then add the start and finish time. - SMS:
If your contract with Tribepad includes the use of SMS, you can select the SMS check box.
You may now select to;
- Invite into an interview only.
This will not generate an invitation. - Continue to email.
You will be presented with a pop up which is the email that will be sent to the candidate.
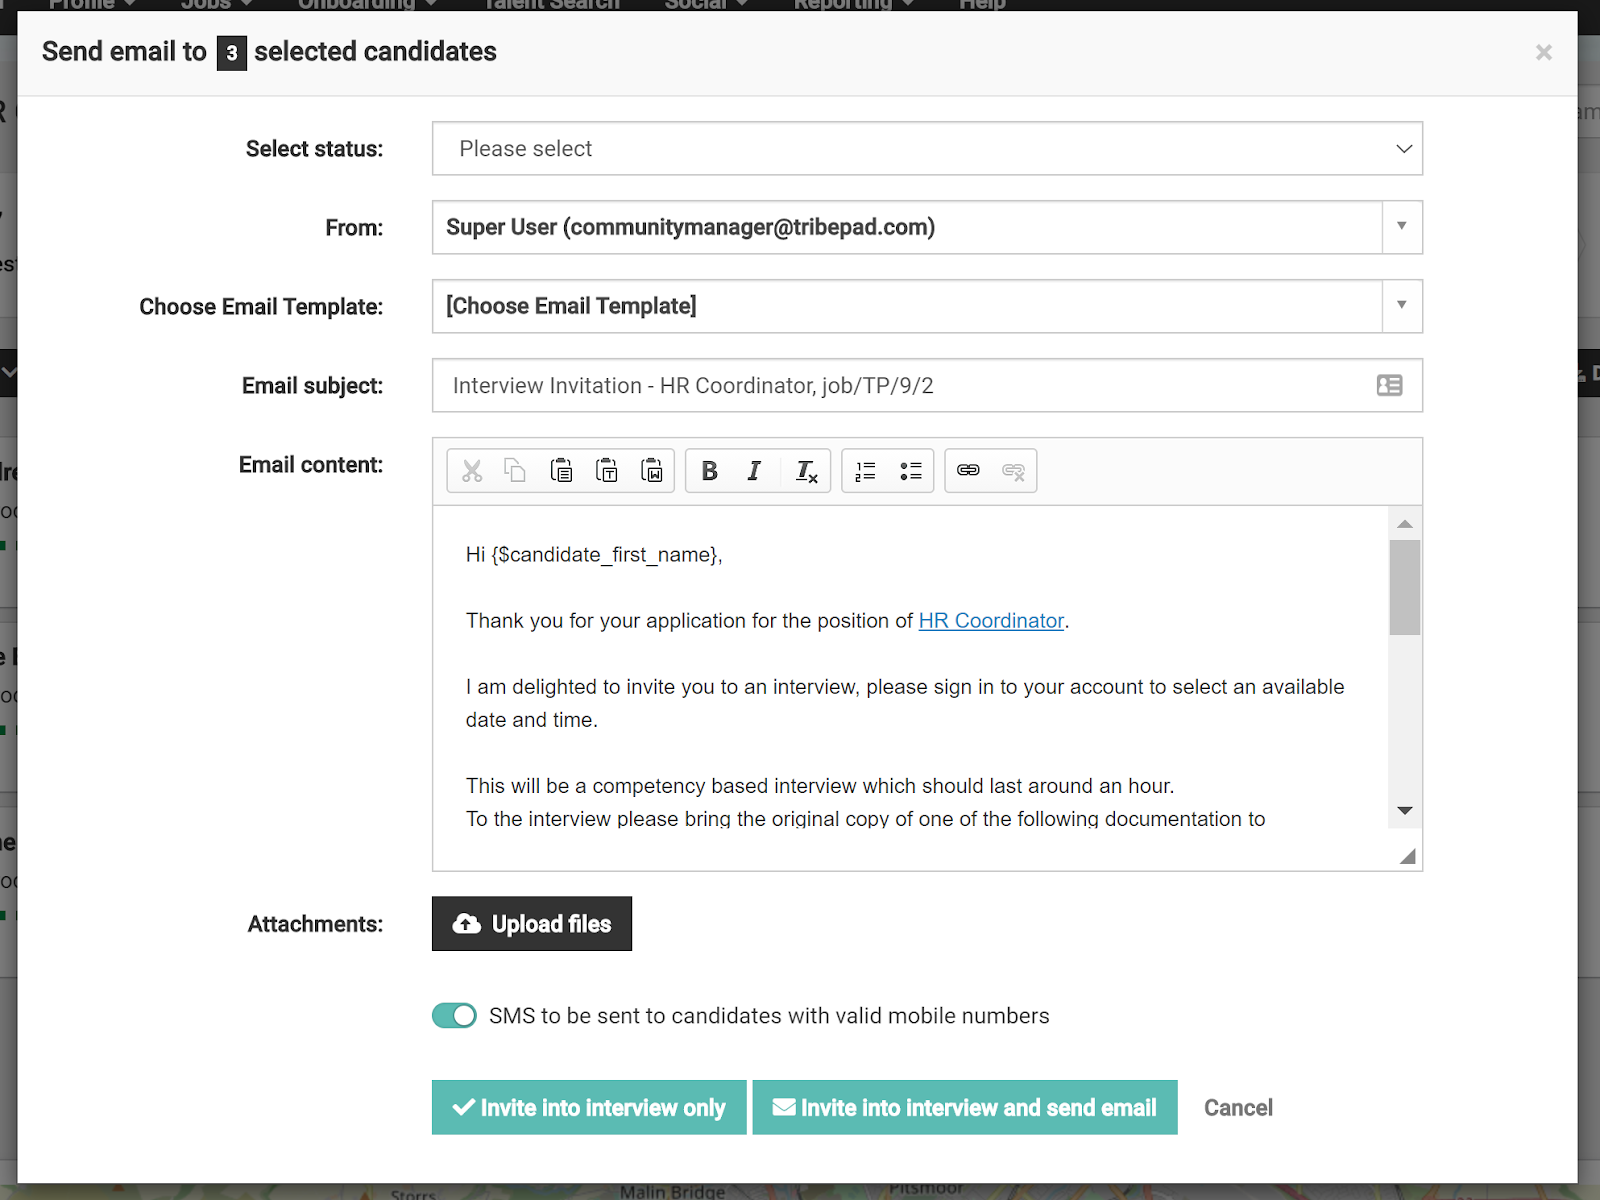
- From
You may have access to this drop down menu, if you do you will be able to choose who the candidate will see as the sender of the email. - Choose Email Template
You may have access to select a template from the drop down menu, this will change the email content shown below. - Email Subject
The content will already be populated, you can delete it to add your own if you would like to. - Email content
This content will already be populated, if you would like to edit it, simply select the box to make your changes. You can also use the icons across the top of the content box to format the text. - Attachments
If you would like to attach a document to send to the candidate, perhaps some interview preparation for example. Select the 'Upload files' button and choose the file you would like to attach from your computer. - SMS
You may have the option to send an SMS, if you would like to send an SMS version of the email, select the toggle to show as green.
Once you are happy with all of the content select;
- Invite Into Interview only.
This will not generate an email or SMS.
- Invite into an interview and send an email.
This will generate an email and send an SMS.
An SMS will only be sent if a valid mobile number is present on the candidates profile.
➡️What happens next?
At this point the candidate will receive an email and a text message asking that they log into their profile and select an interview slot from the dates and times available.
Below is an example of a candidate's profile and the candidate's job applications.
From here the candidate can select to;
- Book or;
- Rebook an interview.
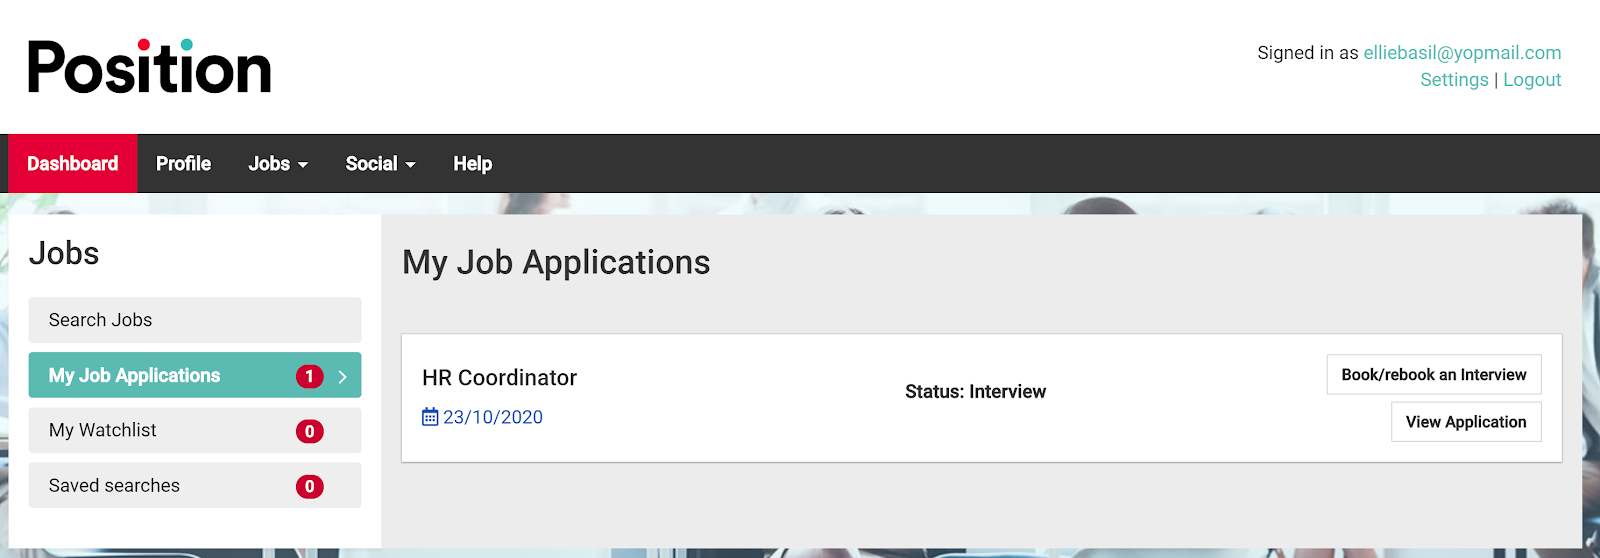
The candidate will then be presented with a list of available dates and times from which they can select what is most suitable.
As soon as the candidate has chosen and confirmed their booking, all attendees' will receive a notification via email detailing the interview details.
- To learn more about this feature click here: Automatic Interview Reminders
Once you have sent the invitation, the candidate will move into 'Interview' status;
From here you can see that the candidate has been invited to a First Face to Face Interview.
- Select Dashboard from the top navigation bar.
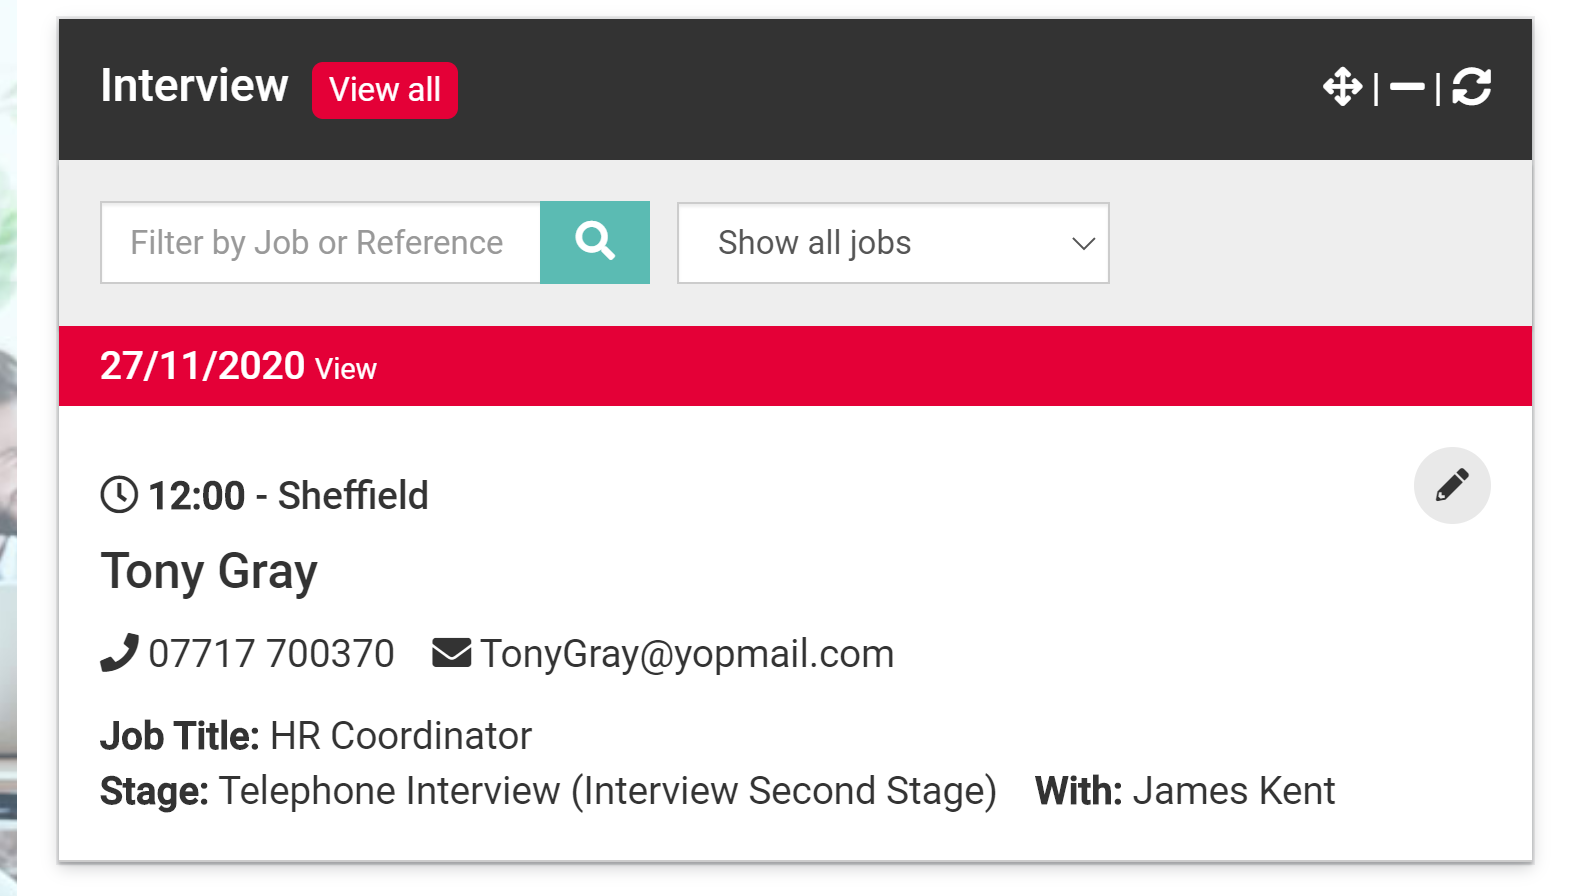
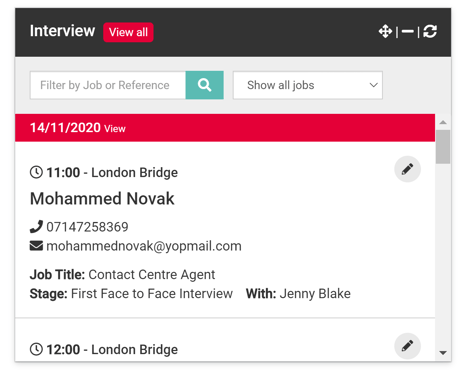
- Navigate to the Interviews widget.
From here you can see details about interviews that are due to take place.

You can also view interview bookings from the 'Interview Slots' page within the 'Job Editor'.
- Select the number against the text 'Booked'.
Highlighted in green below.

You will be presented with a screen similar to the example below, from here you can;
- Use the filters to search for specific roles.
- Print and or download the page.
- View the interview date and time.
- View the candidate name and the job title of the role they are being interviewed for.
- View the type of interview they are scheduled to attend.
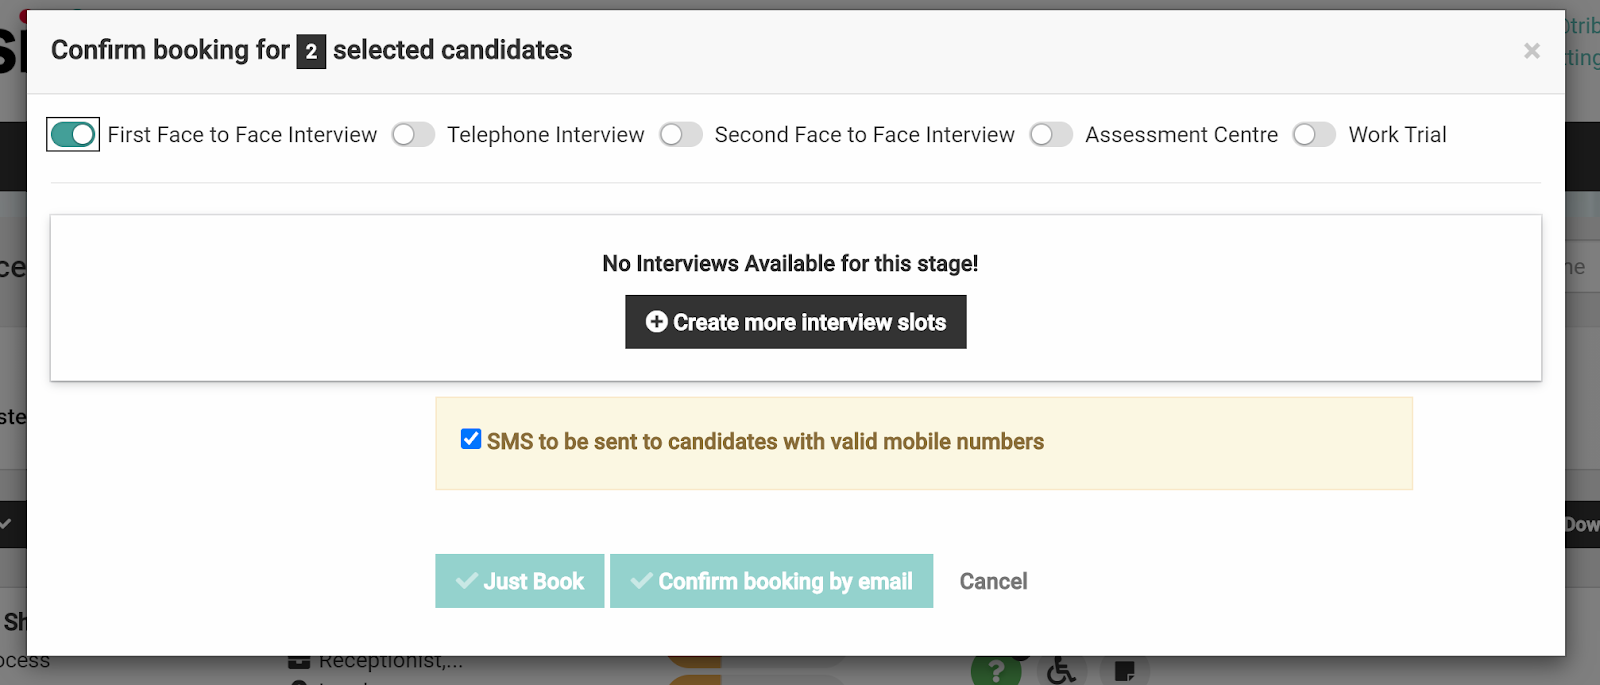
✅ Send Interview Confirmation
To schedule & send interview confirmation.
- Select the candidate/s that you would like to send interview confirmation to.
The candidate processing menu (the cog menu) will become available.
- Select 'Confirmation of Interview'.
A pop up will appear.
Across the top you will see the different types of interviews that are available for you to select from.

Each of the interviews make up what is known as an 'Interview Workflow'.
- To learn more about this see: Interview workflows.
- Select the toggle against the relevant interview type.
In the below example 'Telephone interview' has been selected and you can see in the below example that an interview slot has been scheduled in advance and is still available to select.
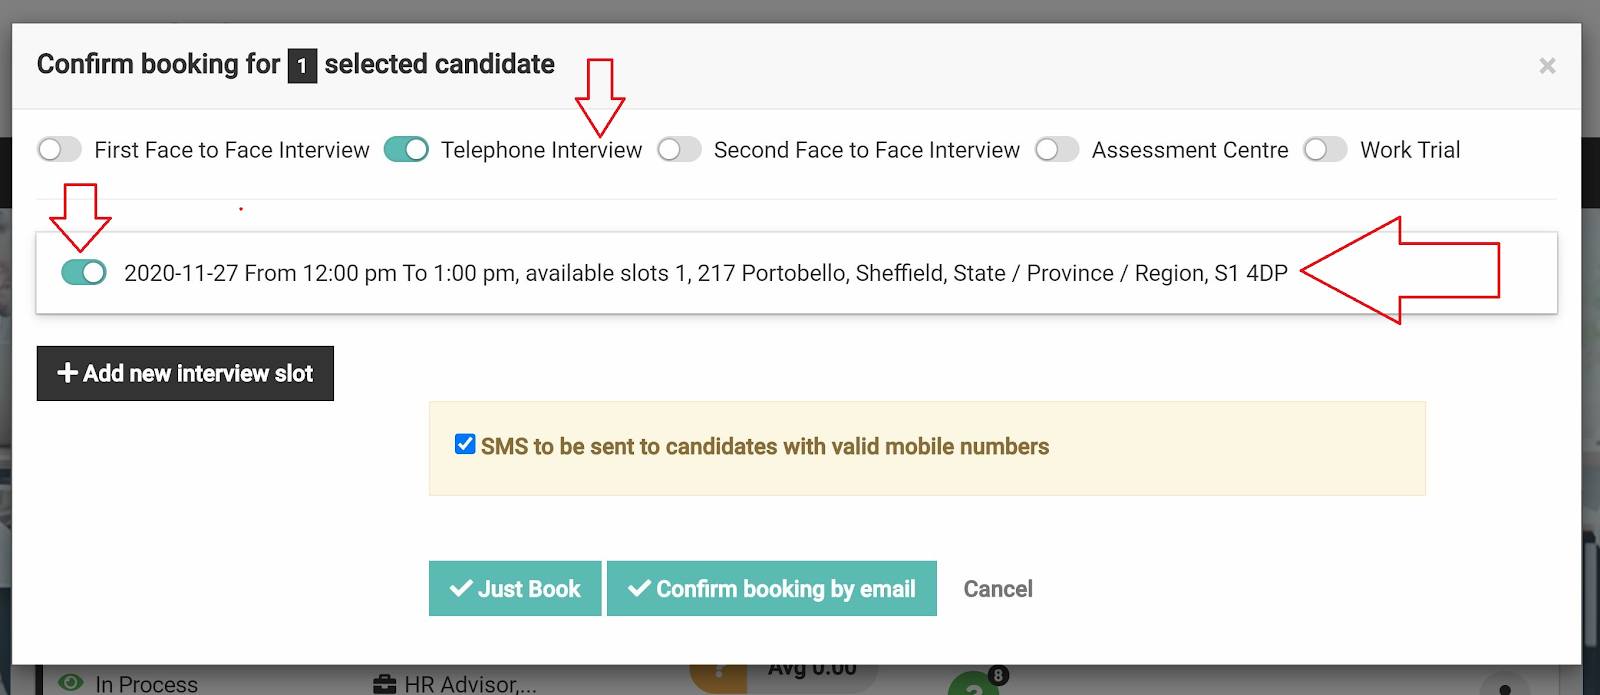
If there aren't any interviews to select from or you would like to create some more;
- Select 'Create more interview slots'.

If you have selected more than 1 candidate to send interview confirmation to and you have already scheduled a number of interview slots you will be able to assign the candidate to the relevant interview slot;
The drop down list provides you with the names of the candidates you selected, you can assign each candidate to the relevant date and time.
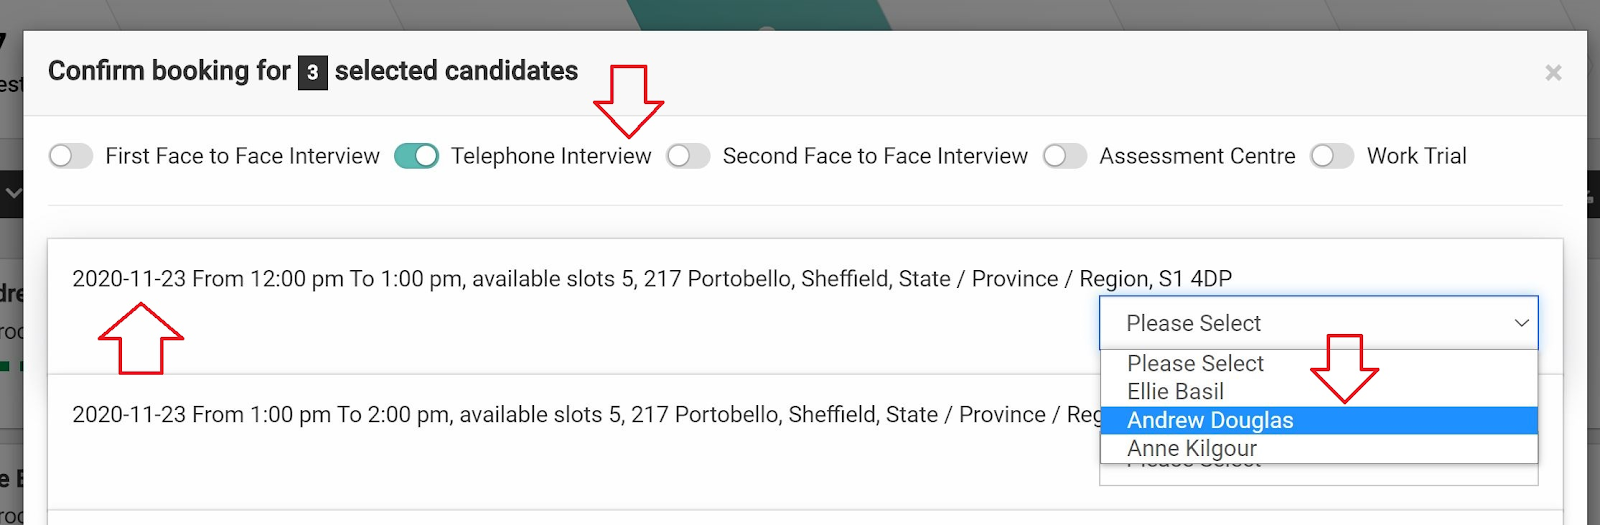
If a date and time isn't shown and you would like to schedule more interview slots;
- Select 'Add new interview slot'.
You will be presented with a pop up;
If you have chosen an interview workflow that requires an address (i.e. face to face rather than a telephone interview). You can select the relevant toggle to;
- Automatically populate the interview address or;
- Add it manually.
- Interviewer:
Add the name and job title of the interviewer - Attendees:
These are the names of any users that have been assigned to the job during the job creation process. Select the toggle next to the relevant attendees if applicable and search for other colleagues in the search bar or type in an external email address. - Number of Candidates:
This should always be 1 when confirming an interview. - Interview
Select the date of the interview, then add the start and finish time. - SMS
If your contract with Tribepad includes the use of SMS, you can select the SMS check box.
- To learn more about SMS 🖱️ see our further guidance here.
If you would like to book an interview without sending an email confirming the interview details;
- Select 'Just book'.
If you would like to book an interview and send a confirmation email to all attendees';
- Select 'Confirm booking by email'.
You will be presented with a pop up, below is an example of the type of email that will be sent to the candidate.
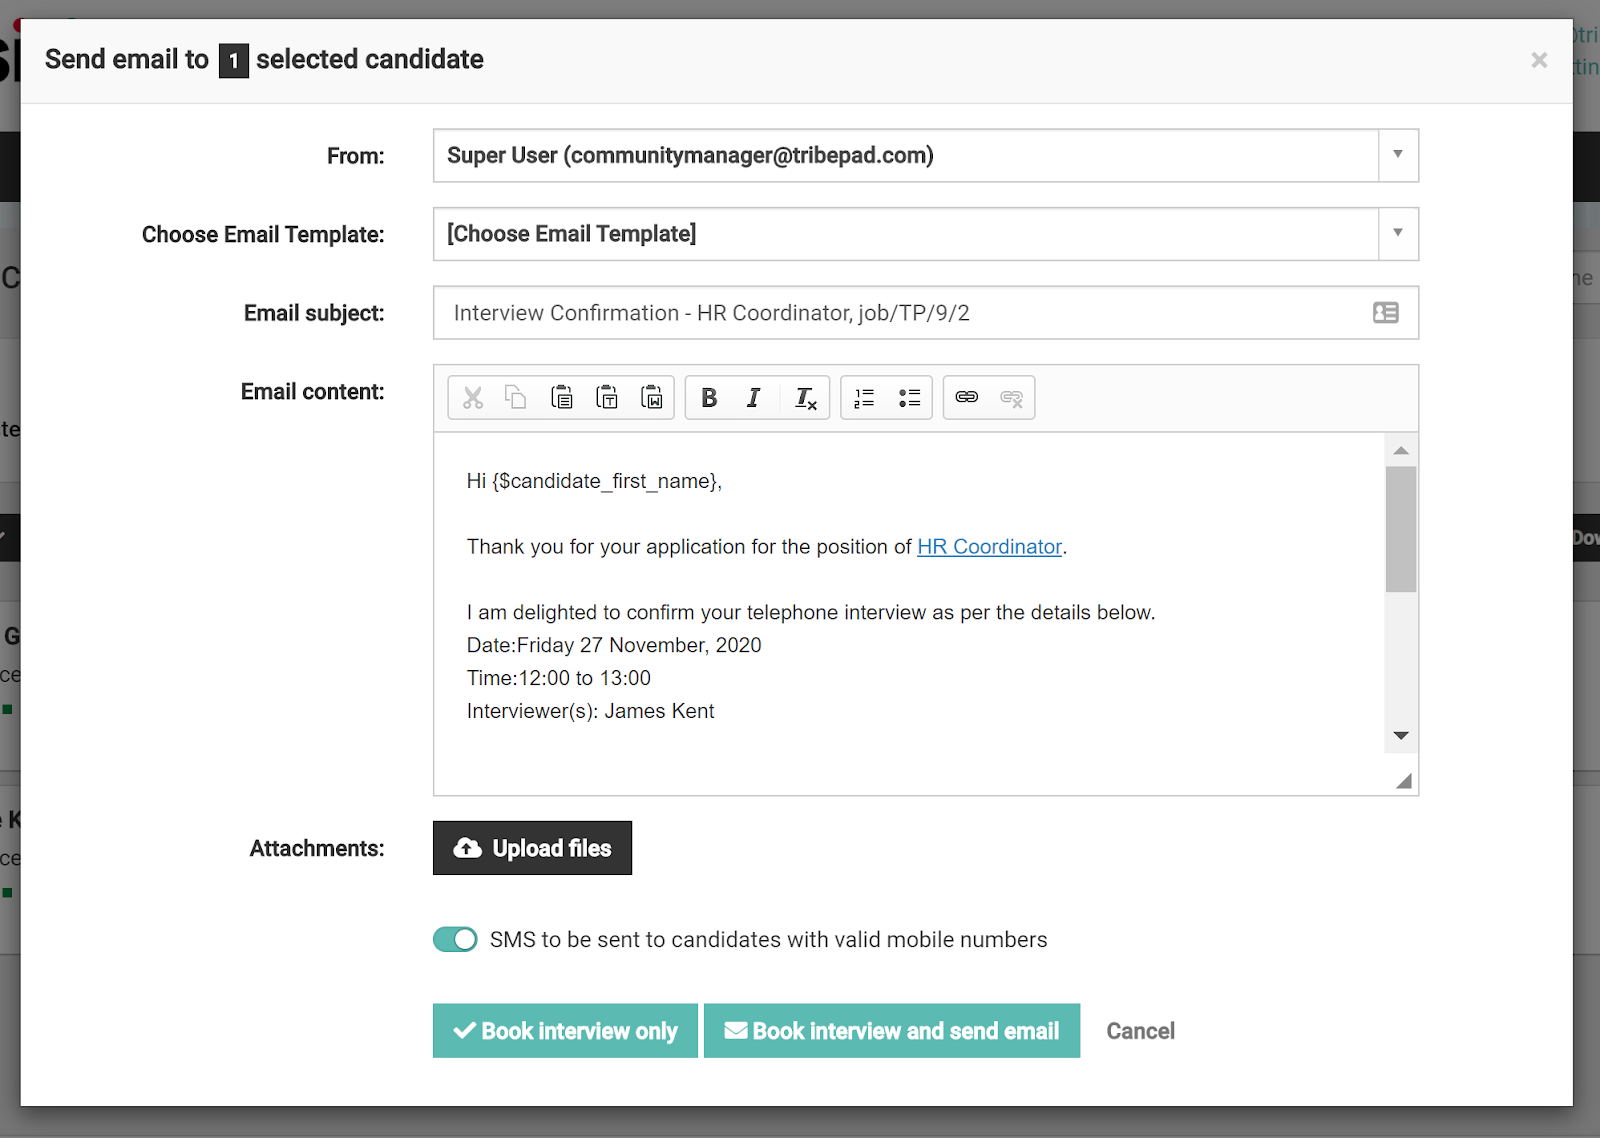
- From
You may have access to this drop down menu, if you do you will be able to choose who the candidate will see as the sender of the email.
Choose Email Template
You may have access to select a template from the drop down menu, this will change the email content shown below.
- Email Subject
The content will already be populated, you can delete it to add your own if you would like to. - Email content
This content will already be populated, if you would like to edit it, simply select the box to make your changes. You can also use the icons across the top of the content box to format the text. - Attachments
If you would like to attach a document to send to the candidate, perhaps some interview preparation for example. Select the 'Upload files' button and choose the file you would like to attach from your computer. - SMS
You may have the option to send an SMS, if you would like to send an SMS reminder, select the toggle to show as green.
Once you are happy with all of the content select;
- Book interview only - This will not generate an email or SMS, but will book the candidate(s) into the selected interview slot,
- Book interview and send email - Interview will be booked and a confirmation email will be sent, if selected, an SMS will be scheduled to be sent 24 hours before the interview is due. If the Interview is within 24 hours the SMS will be sent immediately.
➡️ What happens next?
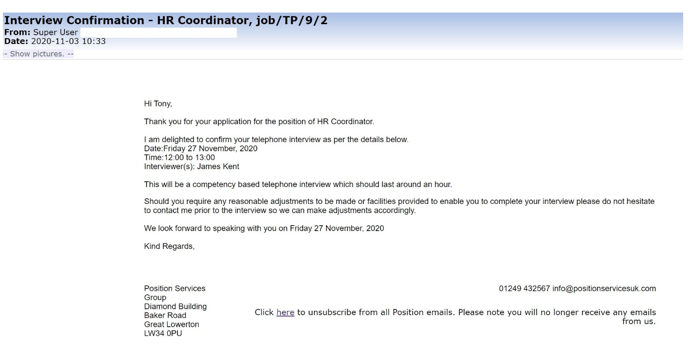
At this point the candidate will receive an email confirming the interview.
The candidate will also move into 'Interview' status;
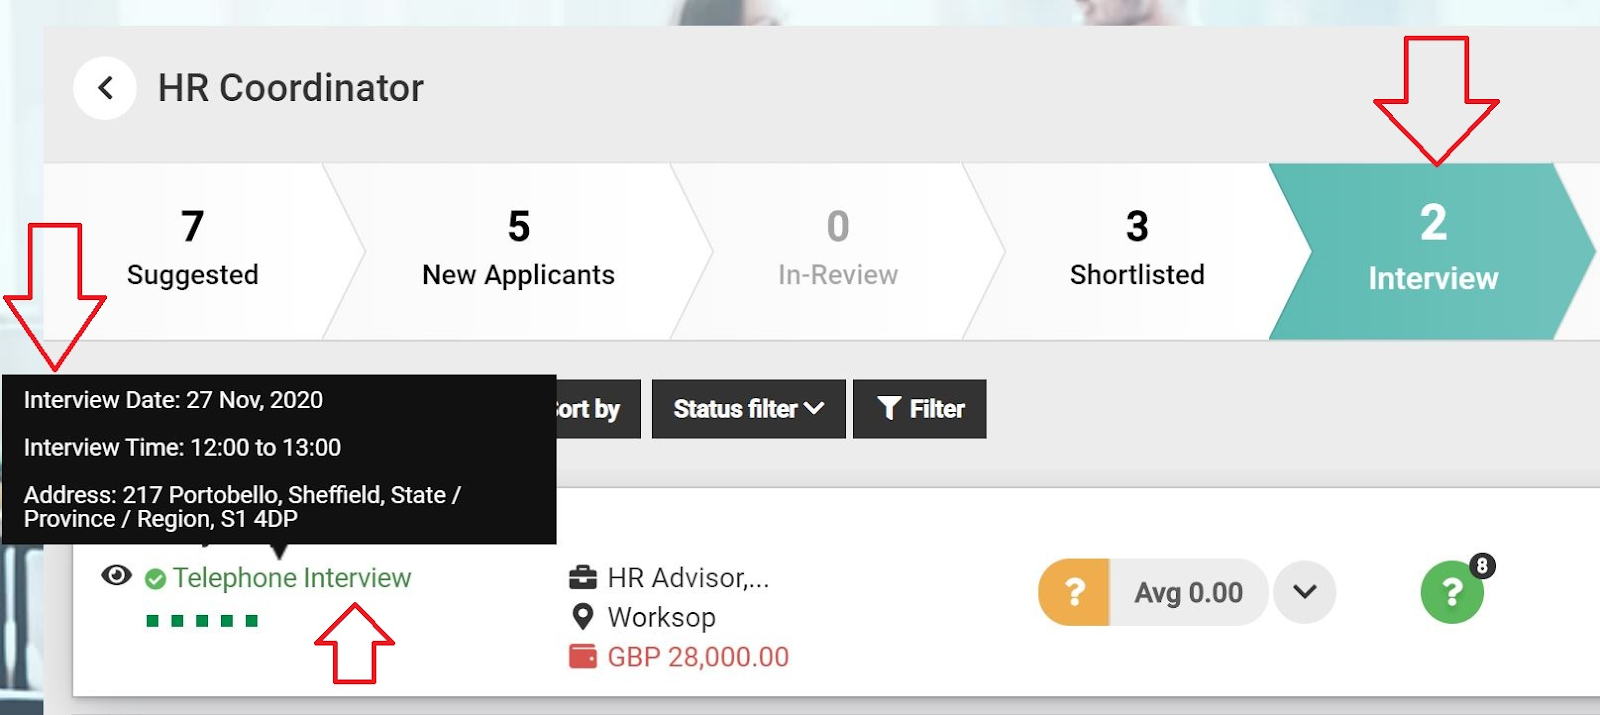
From here you can hover over the text 'Telephone Interview' shown in green and you will be able to see details of the interview.
The interview can also be found within the 'Interview' widget located on your Dashboard.
- Select Dashboard from the top navigation bar.
- Navigate to the Interview widget.


You can also view interview bookings from the 'Interview Slots' page within the 'Job Editor'.
- Select the number against the text 'Booked'.
Highlighted in green below.
You will be presented with a screen similar to the example below, from here you can;
- Use the filters to search for specific roles.
- Print and or download the page.
- View the interview date and time.
- View the candidate name and the job title of the role they are being interviewed for.
- View the type of interview they are scheduled to attend.
🔍 Viewing Interviews
There are 3 different ways to check when interviews have been scheduled for.
📅 The Calendar
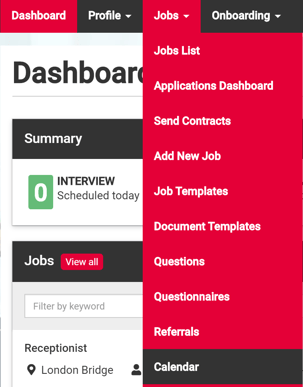
- Select 'Jobs' from the top navigation bar.
- Select 'Calendar'.
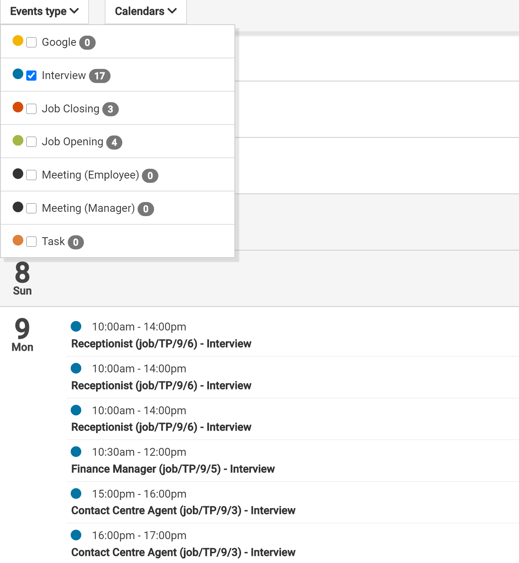
You will be presented with this screen > Select 'Events Type'.
In the example below, interviews can be identified with a blue circle.
- Deselect all check boxes apart from the Interview check box.

This allows you to scroll down the dates on the right-hand side of the screen to gain a view of interviews that have been scheduled.
- Select the job title to see the candidate details.
💻 The Dashboard
- Select 'Dashboard' from the top navigation bar.
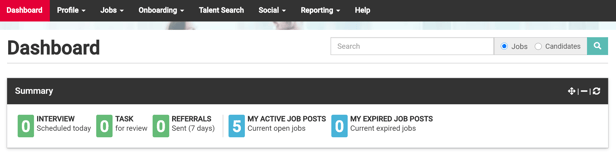
- Scroll down the different Widgets to the 'Interview Widget'.
Any scheduled interviews will appear here, you can use the filters to look at interviews for specific jobs.
- Select the candidate name to navigate to the candidate profile.
- Select the job title to navigate to the job view.
- Select the Edit icon to navigate to the interview slots page.
🕜 Interview Slots Page
- Select to edit a job.

- Select 'Interview Slots' from the job editor.

If interviews have been scheduled they will appear here:
Use the filters at the top of the screen to view the relevant interviews:

- Select the number next to the word 'Booked' to navigate to the candidate and interview details.
🔄 Automatic Interview Reminders
Automatic interview reminders are used to remind candidates that they have yet to respond to an invitation to book an interview.
The automation element helps to streamline your processes removing the need to send manual reminders via email and or SMS.
This feature is very flexible allowing you to choose when a reminder should be sent along with the frequency of the reminder.
🎓Feature
- To set up this feature you will need to have permission from within your organisation and have top-level access to the Tribepad administration tool known as 'Manage'.
- If the feature is enabled it will apply to 'All' jobs and interviews where you/your colleagues have sent an email inviting a candidate to book their own interview.
- To use SMS it will need to form part of your contract with Tribepad. If you are interested in using SMS, please contact your Account Manager at Tribepad.
‼️Notification content
✉️ Email Notification content
To add/edit the email content that is sent to a candidate;
- Select 'Platform Configuration' and 'Emails Manager'.
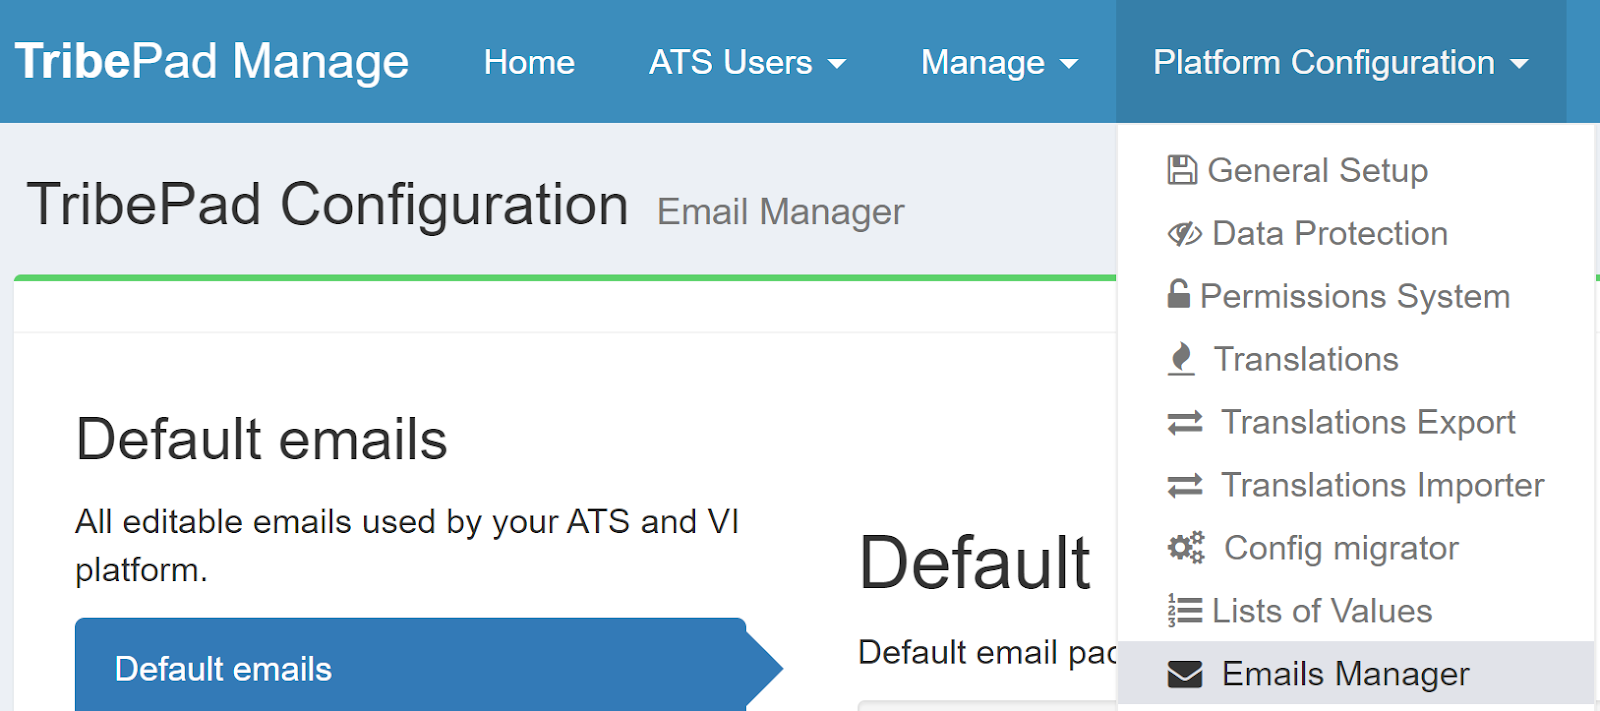
- Select 'Ctrl & F' and search for the email 'Invite Reminder' or
- Scroll down the list of emails to find 'Invite Reminder'.

- Select 'EDIT' under 'Internal Candidate' if you would like to edit the email content that will be sent to Internal Candidates, your employees.
- Select 'EDIT' under 'External Candidate' if you would like to edit the email that will be sent to external candidates.
With both options you will be presented with a pop-up, the example below is the External content.
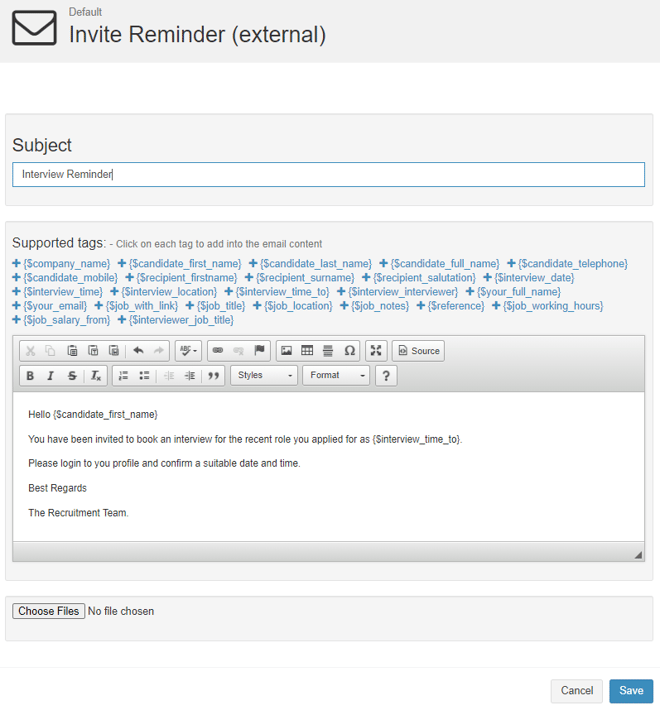
- Subject:
Add a subject for the email content. - Supported tags:
These tags are also known as variables. They allow you to personalise the email content, for example (+$candidate_first_name) will collect the candidate's name and populate it when the email is generated.- To add a tag, first select the area in the content box where you want it to appear, then select the tag.
- Content:
Add in the content that you want the candidate to read.
You can use the formatting tools at the top of the content box when adding your wording.
- Choose files:
If you would like to include a document with the email you can upload a document by selecting the 'Choose Files' button.
Once you are happy with your content;
- Select 'Save'.
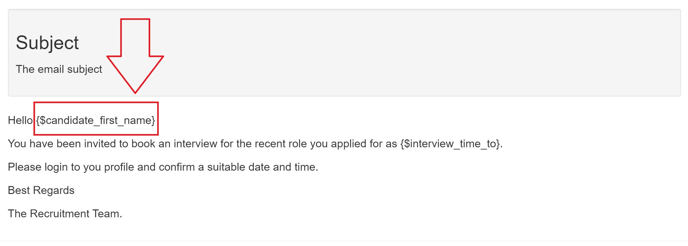
🔍 Previewing the email content

- Preview.
The preview button allows you to view the email.
If you have included variables in your email content you can use the filters to populate the variable with meaningful content.
In the below example {$candidate_first_name} has been added as a variable to the email content.
In preview mode select;
- The drop-down menu next to the wording 'Candidate'.
- Select a name from the list presented.
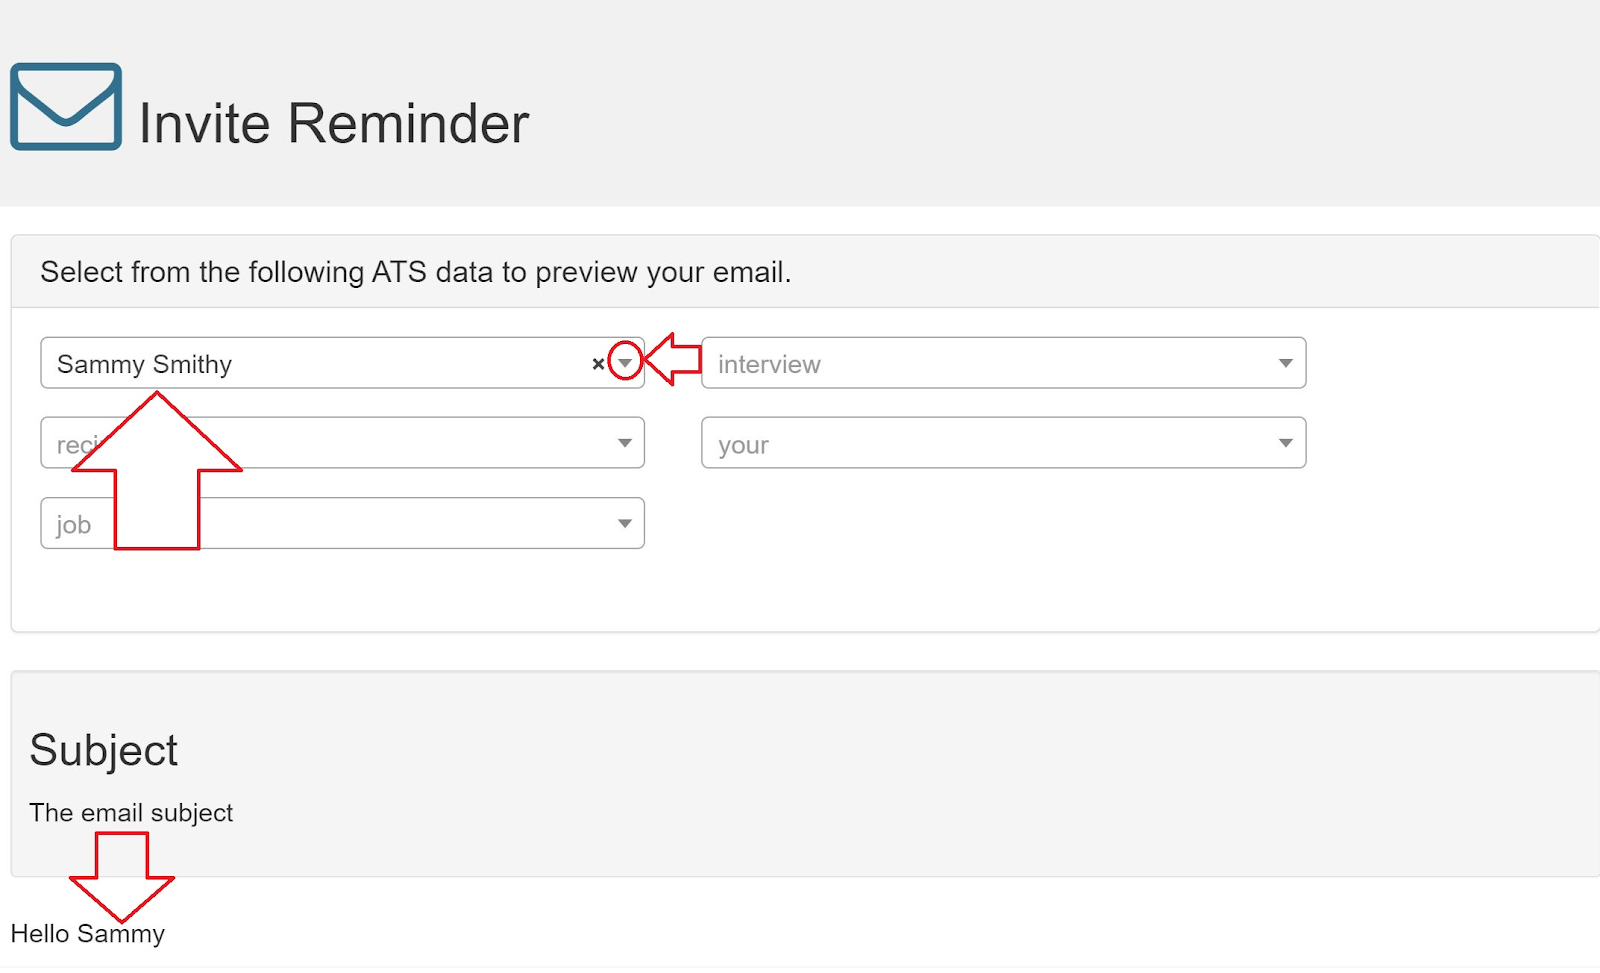
You will see the variable change to the name you selected.
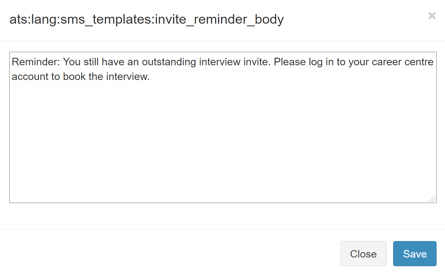
📳 SMS Notification Content
The default content for the SMS notifications is shown below.
There are 2 ways to change the content sent in an SMS notification;
- If you would like to change this wording and you already use SMS, please speak to the main ATS lead within your organisation.
- If you would like to start using SMS or you are in the process of implementing SMS with your Tribepad Account Manager, please discuss making changes at that stage.
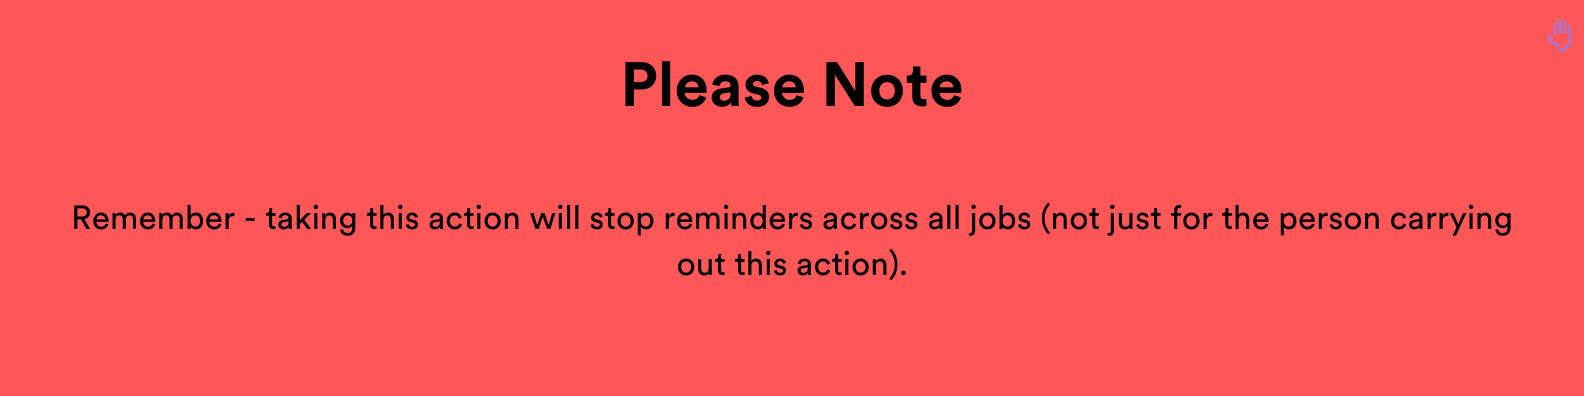
🛑 Stop Using Automatic Interview Reminders
If you no longer wish to use this feature, simply log in to manage and remove the content from the scheduled task.