In this article we will guide you through completing the first page of the job creation process.
Please be mindful that this article presumes that the user has full access to create a job from start to finish without the use of job templates.
You may see features that are not available to you, if you do see a feature you are interested in using, please speak to the main ATS lead within your organisation.
Please use these guidelines alongside your internal processes.
Navigating to create a job
- Login and select ‘Add New Job’ from the top navigation bar.

You will be presented with the very first page in the job creation process.
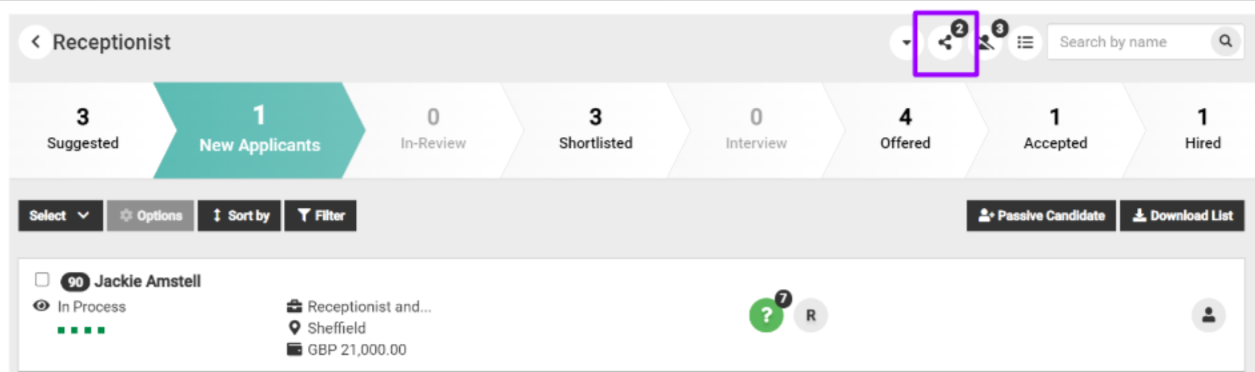
Job editor progress bar
At the top of the page you will see a Progress Bar, this will tell you where you are in your job creation journey, right up to the job being published.

You will see the current status of your job, just below the progress bar.
Job set up - Job template selection
Job templates are a great way to ensure that the teams involved in publishing roles are always using a consistent format.
Select the option below to view separate guidance.

Job setup - Job details
-
- Enter the job title for the role that you are recruiting for.
- The job reference field is automatically populated.
- The reference can be deleted and you can add something different, but you should check what your internal process is before making any changes.
-
- Enter the number of positions you are recruiting for.
Please note - You are also able to recruit in Hours if you wish.
To find out more about this functionality, please click here.
-
- Select the relevant job category from the drop-down menu.
- The job categories listed will correspond with the structure of your organisation.

Job Category examples:

-
- Enter the contractual working hours.
- Select the contract type from the available options.
- Select the contract template.
- This is only relevant if you use our Contract Management software.
-
- Enter the contract details.
- The text you enter here will not be visible on the job advert but could be useful for internal notes.
-
- Select the salary currency from the available options.
- Enter the minimum & maximum salary.
- If you do not want this to be visible on the job advert you must enter some text, in the ‘Salary text’ field.
-
- Select the salary frequency from the available options.
- Enter some text such as ‘Competitive salary’.
- This field, if completed will be visible on the job advert, it will also mean that the salary range will not be visible on the job advert.

-
- Select the Country where the role will be based from the list of available options.
- Enter the job location.
- Please enter the full & correct location to ensure the candidate can search for the role based on their search criteria.
The map on the job advert requires a specific and full address for it to show an accurate location.
-
- Enter the postcode (zip code) for the job location.

Please note - you are able to add multiple locations to your job now. For more information, click here.
-
- Select a region or division from the list available.
- Select a business unit from the list available.
- Select an internal category from the list available.
- Add a cost centre.
- Not all organisations will use a cost centre so this may not be a visible option to you or you may be required to select from a static list.

Job setup - Assigning users to a role
Assigning specific users to a role allows you to share the job with the user/s you have assigned to it.
One example where you may like to assign a user is if you are going on annual leave and you would like a colleague to manage the role while you are away.
The user/s that you assign will still be restricted in accordance with their user type (i.e they may not have the same visibility and be able to carry out the same actions as you in the ATS as you).
How does it work?
As soon as you publish the role, the assigned user/s will receive an email notification. The email will contain a link to select and by selecting it, they will be able to log in and navigate to the job.
By default the Hiring Manager role is set to the user that is creating the job, you will normally see the name of the user rather than ‘Super User’.
-
- Select the button to the right of the role (i.e. the button to the right of Job Hiring Manager).


-
- Type in a user's name and select the search icon to filter users.
- When the user’s name appears in the left-hand box below, select the arrow pointing to the right (show against each user’s name).
- The user’s name will appear in the ‘selected’ box on the right-hand side.
- Select save.
- Repeat the process if required.
You are only able to the share the job with individual people according to their user type, at this stage.
If you wish to share the role with multiple people, for example multiple Hiring Managers, once you have published your job, you can share a role with several users by selecting this option within the Job Flow:
Job setup - Job activity
The job activity is an additional feature that allows you to automate withdrawing or rejecting candidates at a specific recruitment stage of your choice and or you can choose to automatically close a job.
Activity relates to the candidate and the user processing the role (i.e both users have to have been inactive for your chosen number of days).

If you do not have this feature enabled and would like it to be so, please speak to the main ATS lead in your organisation.
Job setup - Job notifications
Job notifications are sent to the email address/es that you enter here every time a candidate applies for the job you are recruiting for. Useful if a user doesn’t need to log in to the ATS on a regular basis.

Job setup - Job application settings
Video interviewing is an additional feature that will only be available to select if it has been agreed as part of your contract with Tribepad.
If it is part of your contract, you can select from a list of available video interviews that you or your colleague(s) will have already created.

If your user type permits you will also be able to;
-
- Select ‘create a new video interview’.
This action will take you straight to the video interviewing platform.
-
- Select the check-box to include the selected video interview as part of the candidate’s application process.
The candidate will need to complete the video interview as part of their initial application for the role you are recruiting for.

If you are interested in video interviewing - please see our Video Interviewing guidelines.
If you do not have this feature enabled and would like it to be so, please speak to the main ATS lead in your organisation.
Job setup - Application flow
These are the steps that you require any candidate to complete when they apply for this particular role.

The application flow is split into steps;
The registration pageWhen a candidate selects to apply for the role, they will be presented with requests for information in order to register their profile.
- An email address.
- A password.
Sometimes candidates may register using Facebook, LinkedIn - see more details here.

The profile builder contains everything that you may need to know about the candidate, which may incorporate their address and date of birth.
You will also see information about their career history and skills along with details about their job activity, such as information about job applications they have made.
The information that you choose to include here (by making fields not required, optional or required) is entirely your decision.
The profile builder allows you to select the toggles to make certain information optional, required or not requested.
When you are toggling fields on an off , you may wish to consider how long the application process should be.
For example, if you make asking for a CV a requirement, perhaps consider if you still want to make providing details about the candidate's career history, a requirement.
- It is best to try and avoid duplicating requests for information

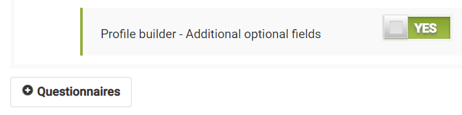
Also included in the Profile Builder section, is an optional toggle for 'Additional optional fields'.
This relates to 3 additional fields:
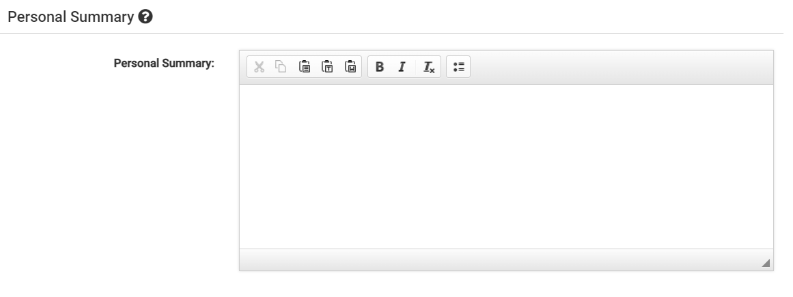
- Personal Summary
- Interests and Hobbies
- My Personal Reference
Like everything, you can choose to include these options or not. They are included as a free-text field in the application:
These fields do come as a 'package', i.e. they are all either turned on or off, you cannot choose out of the 3.
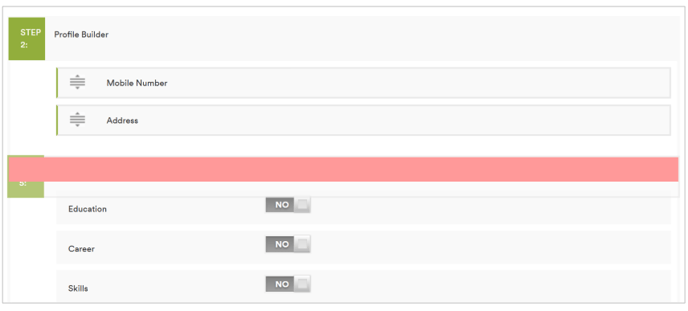
Wherever you see this symbol, ![]() you can change the position of the field. In the example above, mobile number and address for the candidate can be moved around.
you can change the position of the field. In the example above, mobile number and address for the candidate can be moved around.
You may wish to move them further up in the application process, for example.
- Simply select the icon, drag and drop the field into the position you would like.
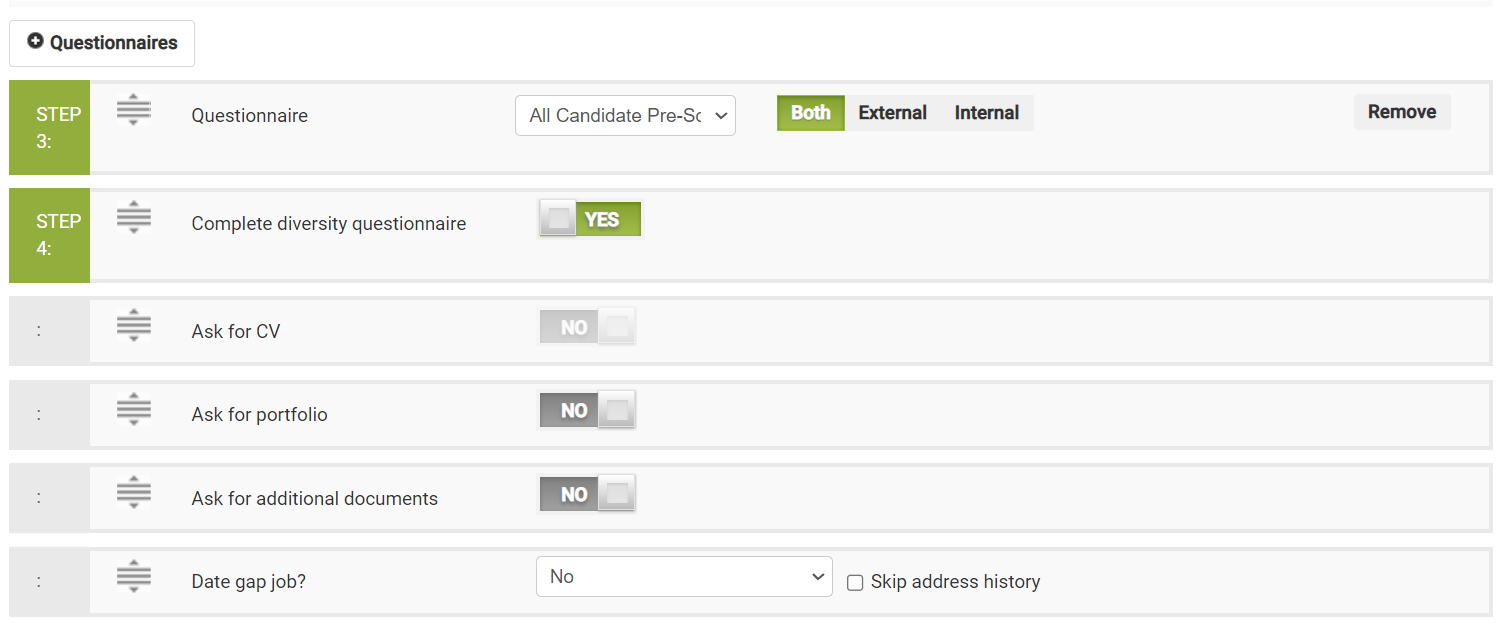
Questionnaires
At the bottom of the Profile Builder, is a section where you can add in Questionnaires to your application.
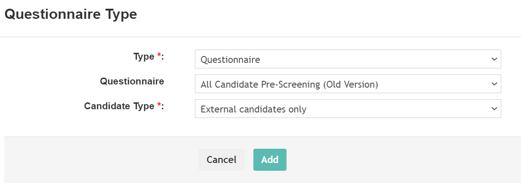
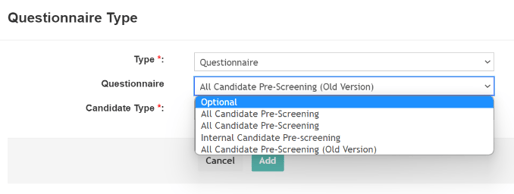
Select the questionnaires button and you will be presented with a pop-up.
-
- Select the questionnaire type.
Some customers choose to use 3rd parties to provide them with psychometric type questionnaires, that option would be available under ‘type.
-
- Select questionnaire.
Pre-screening questionnaires are generally used as part of the candidate’s application journey to help you streamline your candidates right at the start of the recruitment process.
If you have already set up a pre-screening questionnaire, you will be able to select it from the drop-down list.
- You can add one or more questionnaires to the candidate's application process. You can also choose to have the feature enabled which allows you to select your own diversity questionnaire too - great if you regularly change or update your diversity questionnaire or you have more than 1 to choose from.
-
- Select candidate type.
Select whom you would like to complete the questionnaire e.g. just external candidates etc.

When the questionnaire is inserted into the Application Flow, it will show as something like this:

- You can then use the
 symbol to move the questionnaire into whatever position you choose.
Something you can also do, is add a questionnaire to the Registration page of your Application Flow.
- To do this, you can simply add another questionnaire then use the symbol to move it all the way up the page.
You will see a red line as you move it through the 'Profile Builder' section - this indicates that you cannot move the questionnaire to this section:
- Keep moving your questionnaire up until you are above the Profile Builder section:
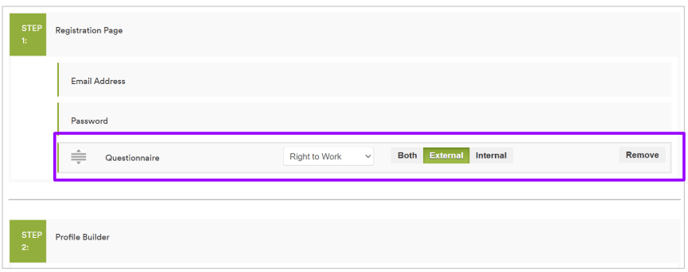
Please note - if you choose to move a questionnaire up to the Registration page, it is really important that you do not use a branching questionnaire.
- Please only use a standard questionnaire type when performing this action
- If you use a branching questionnaire on this Registration page, you will experience errors and your candidates will not be able to apply to your role.
You are also able to add in Integrations to the application process at this point. Simply select the 'Type' drop-down and select 'Integrations':
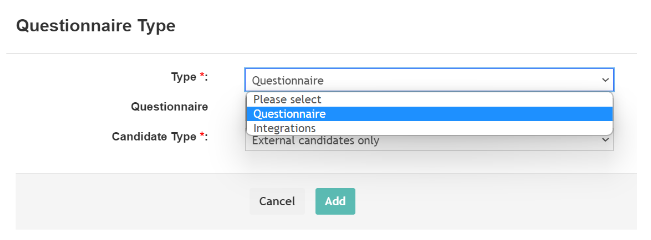
For more information on adding in Integrations to your platform and the type of Integrations we can support, please speak to your Account Manager.
Ask for CV
Think about whether you would like the candidate to upload their CV as part of their application.
- You can make the option required, optional or not required.
- You can choose to add some text in the field to the right of ‘optional’ - to provide guidance.
If you make it a requirement for the candidate to upload their CV, you may want to avoid asking for career details, so that the candidate isn’t duplicating application information (that could cause candidate drop-offs).
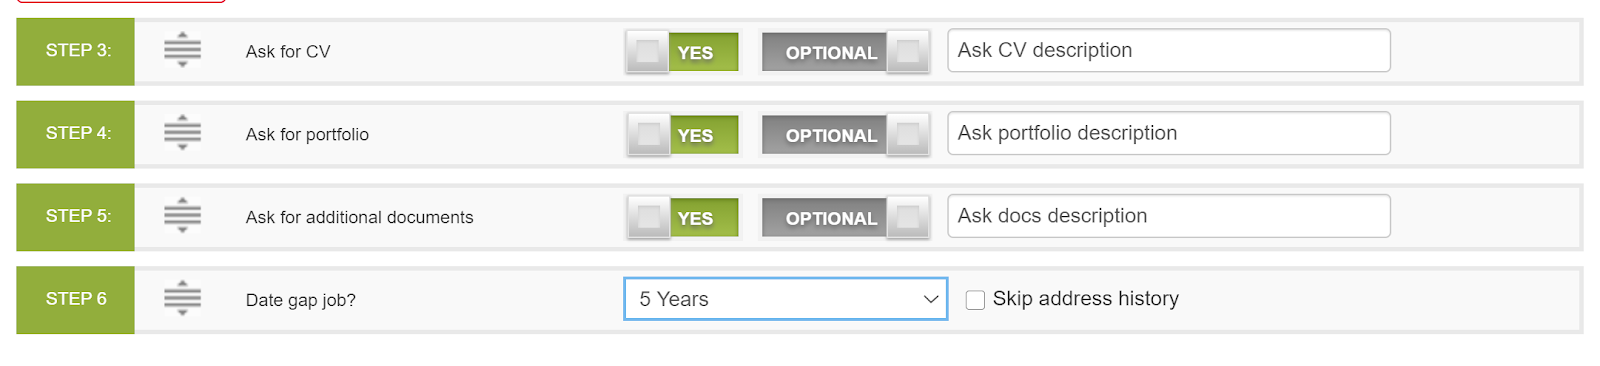
Ask for portfolio
Depending on the role you are recruiting for you may want to ask the candidate to provide a portfolio. The candidate may provide a link to their current website or even a video showing their journalism skills for example.
Ask for additional documents
Think about whether you need to see evidence of qualifications the candidate may have gained, you could ask them to include that type of information - when the candidate reaches this step in the application they will need to upload documents.
Date gap job
Some organisations need to account for a candidate's previous job and or address history spanning X number of years.
Date gap allows you to collect this information and also allows the candidate to account for a Life Event (perhaps a candidate has just left further education and cannot provide any career history).
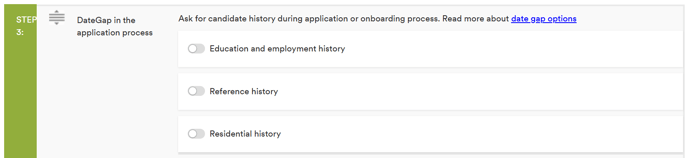
For further information on the Date Gap section, please click here.
Diversity Questionnaire
The final step in the candidate's application process is to choose when you would like to provide your diversity questionnaire (if applicable).
- Toggling the Diversity questionnaire on means the candidate can complete the questionnaire at this point if they wish.
- However, if you would like to make your Diversity Questionnaire a mandatory part of the application process, you can use the symbol to move the questionnaire up into the main part of the application flow:

Moving the Diversity questionnaire upwards in the application process does ensure that you collect ED&I information relating to each candidate.
However, the candidate still has the option to state 'Prefer not to say' on each question if they do not want to provide this information.
The application progress bar toggle can be selected so it shows as ‘Yes’ and if you would like to provide the candidate with the extended version, move the toggle to show ‘Extended On’.
![]()
This will provide the candidate with a progress bar during their application so they know what they have completed and what actions are remaining.
Once you have finished setting up the candidate's Application Flow you can minimise the menu.
Candidate Processing - Email pack
Every email that is generated by the ATS is part of what we call an email pack.
Your organisation has the tools to customise the email pack so that you can communicate with your candidates in a way that is appropriate.
There is one main default email pack to start with.
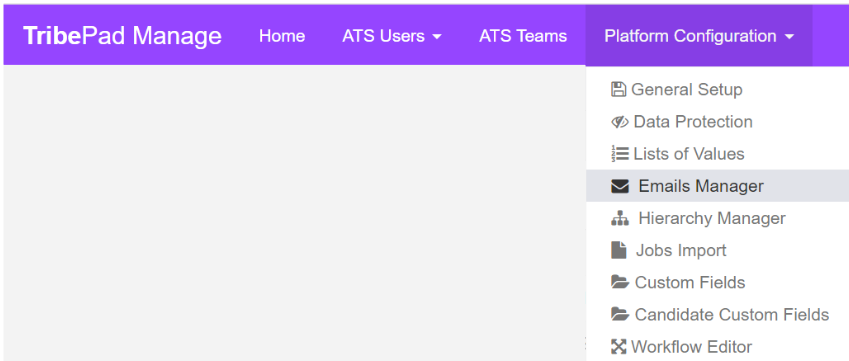
Email packs can be customised in the Manage tool.
Go to the 'Platform Configuration' tab and select the 'Emails Manager' drop-down option in the menu:
Only specific users in your organisation have access to Manage. If this is something that would be useful to you, please speak to your main ATS lead in your organisation.
We also offer the option to use a feature called ‘Custom Email Packs’, this is in addition to the default email pack.
A custom email pack is a copy of the default email pack and can be customised so that you may align the customised pack to a specific role. You could have one or even multiple customised email packs if you wanted to.
The menu below allows you to choose from the default email pack or any customised email packs that have been created.


If you do not have this feature and you are interested in it, please speak to your Tribepad Account Manager.
Candidate Processing - Onboarding
If you use our Onboarding feature as part of your contract with Tribepad, this menu will be available.
Onboarding packages are created to house various onboarding materials, for example, policies that you would like a hired candidate to read and acknowledge, Welcome videos or the ability to provide bank details.
- Select the relevant Onboarding Package (or 'Template') from the available list shown in the drop-down menu.

Candidate Processing - Candidate 3rd party checks
Tribepad allows integration with TrustID so that you may implement the right to work and background checks as part of your recruitment process within the ATS.
The set up for this feature varies for each organisation so please follow your internal process for requesting the right to work and or background checks.

If you don't yet integrate with TrustID and you are interested, please speak to your Tribepad Account Manager.
Candidate Processing - Anonymising candidates
Anonymous applications are an additional feature that can be enabled to help you ensure that candidates are being screened fairly and without any unconscious bias, right up to the interview stage.
How does it work?
If the first checkbox is selected, when you send a CV to a hiring manager, for example, their details will be anonymised.
The CV that is generated is the Tribepad CV, not the candidate’s own CV.
With that in mind, it is best to ensure that you ask the candidate to complete all of their profile as part of the application process.
(If the first checkbox is selected, the second checkbox also becomes available).

If the second check box is selected the candidate's profile and application will be anonymised right up to ‘Interview Stage’.
Tribepad cannot anonymise a CV that the candidate has uploaded of their own.
If you are interested in enabling this feature, please speak to your main ATS lead in your organisation.
Candidate Processing - Application restriction groups
This is an additional feature that allows you to set up a 'restriction group' per vacancy.
This will prevent candidates from applying for the same type of job within a defined time period, for example, once every 6 months, or once per year.

Max Applications
A typical restriction group could be 'Restriction 1 - Max. 4 applications within 365 days'. Candidates will only be able to apply for 4 jobs.
They will still be able to apply for further jobs if the other jobs do not have this restriction group applied.
For example:
-
- A candidate applies for 4 jobs.
- They have reached the maximum number of applications, and can no longer apply for any other jobs with this setting for the specified time period.
- When the time period has passed, the counter is reset and the candidate will be able to apply for jobs with that setting.
Max Unprocessed Applications
An example of a max unprocessed application is 'Restriction 2 - Max. 3 unprocessed applications within 1 days'.
For the max unprocessed applications, a candidate can have up to 3 unprocessed applications within 1 day for jobs with this setting.
Status’ such as hired, rejected or withdrawn applications are considered processed.
For example:
-
- A candidate applies for 3 jobs.
- They have reached the maximum number of applications, and can no longer apply for any other jobs with this setting for the specified time period.
- Then, when the candidate is processed into either hired, rejected OR withdrawn for one of the jobs, then the counter is reset to 2 applications.
- Because the counter is reset, and they have been processed for one of the jobs, they can not apply for a further 1 job with that application restriction group attached.
Candidate Processing - Questionnaires
Questionnaires can be used at all different stages of the recruitment process. They can be aligned to candidates, hiring managers and other colleagues.
Questionnaires are a great way of capturing information in one place, helping to streamline your recruitment process, by ensuring everyone is answering the same or similar questions.
You can also report on questionnaires and questions within our reporting software, Insights.
At this point in the process, you can choose to align specific questionnaires to the role you are recruiting for by selecting the drop-down menu and the corresponding questionnaire.
- Shortlist questionnaire
- A shortlist questionnaire could be used to assign to a recruiter, the recruiter may answer questions as to why they feel the candidate should be shortlisted.
- CV feedback questionnaire
- A hiring manager might be asked a set of questions about the candidate's CV, the answers may result in the candidate being interviewed or declined.
- Interview feedback questionnaire
- This could be used to gain the interviewers feedback on a candidate by asking specific questions that relate to the experience that is crucial for the role.
- Offers questionnaire
- This could be used to capture details about a candidate’s offer, such as salary, start date, whether IT equipment has been ordered.

To find out more about Questionnaires, click here.
Candidate Processing - Interview workflows
Under the interview stage, you may see an option called ‘Workflow’ - this is related to interviews, not questionnaires.

An Interview workflow represents the different stages of interview progression.
In the example below, ‘Second face to face interview’ is the 3rd stage in that particular interview workflow.

Interview workflows are useful if you have different interview requirements for specific roles.
You can create up to 5 separate interview workflows any of which can be selected at this point in the job creation journey.
Interview workflows are amended in Manage, under the 'Workflow Editor option: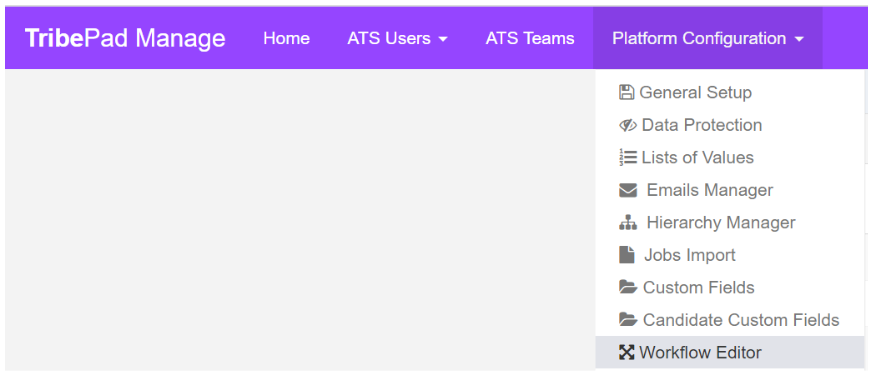
Custom fields
Custom fields allow you to capture additional information about the role you are recruiting for. The type of information that you might capture could be the reason for recruitment (i.e. Business, as usual, new employee, contractor etc).
If your organisation uses custom fields, they may be a required or optional field depending upon your internal process.

Custom Fields are managed in Manage,under the 'Custom Fields' option: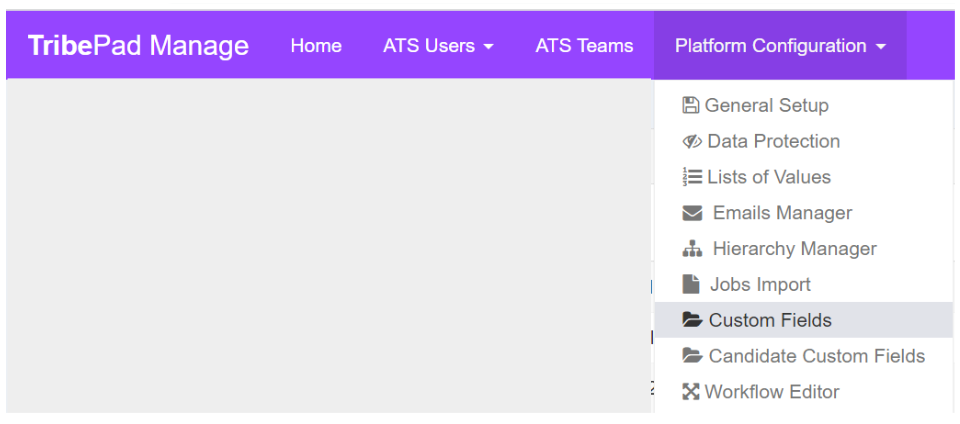
Custom notifications
This is an additional feature that allows you to automatically notify specific users about an action that has been taken.
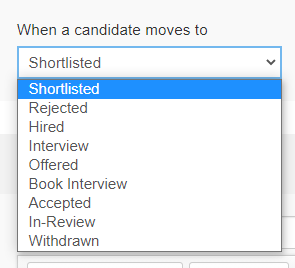
In the below example a notification has been set up to let the candidate know when they have been shortlisted.

- Select the stage at which a notification should be generated:
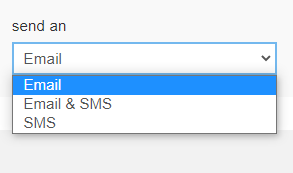
- Select the notification method:
- Select who the notification should be sent to:

- Add your content (the message that the user will receive).
- Format the content using the different icons at the top of the content box. You can also add links and images.

Your notification is shown beneath the content box, you can select the ‘remove’ button at any time and you can continue to add more notifications if required.

Job Dates
Choose the dates that you would like to make the role visible for applications.
- Choose who the role should be visible to
- If you would like it to be visible to internal employees and external candidates, choose ‘everyone’ - If you would like to make the role visible to internal candidates initially and then everyone from a later date, use the ‘then from’ option
- Evergreen jobs
- If selected, this means that your role will never expire - Enter an expiry date (if the role isn't Evergreen)

Select ‘Next’ to continue or if you would like to save your content and complete it later select, ‘Finish’. Cancel will close the page and you will lose all of your content.

If you select ‘Finish’ your role will be saved in the ‘Unfinished Jobs’ filter found on the ‘Job List’ page.

To continue on to the next stage of the job creation process please go to;